Showing posts with label Dragon Nest. Show all posts

Tuesday, November 6, 2012

Dragon Nest (Part Five)

Farming, Fishing & Cooking
Dragon Nest - Farm District
Once you've reached level 24 and arrived at Saint Haven, you will then be able to access the Farming District via the Channel List.
Dragon Nest - FarmingDragon Nest - Fishing
Activities you can do in this farming district includes farming, fishing and cooking. And the general idea behind these activities is that you grow and fish for ingredients which are used in cooking various kinds of food items.
Dragon Nest - Red Beard SaladDragon Nest - Spicy Temple Soup
These food items, when consumed, will in turn bestow upon your character various kinds of effects such as recovering HP/MP and giving temporary boosts to stats. But before you can start doing these activities, you will need to find the Farm Manager and pick up the quests he gives in order to get the respective "Secondary Skills" (Farming, Fishing and Cooking).

Farming
Dragon Nest - Temple Grass SeedDragon Nest - Watering Can
The first few things you will need before you can go out to plant your first crop are the following:
  • Sickle - You will need this tool in order to harvest your crops. Once you've acquired one, there is no need to buy any more of it as it lasts forever.
  • Seed - Naturally, you can't grow anything without its seeds right? Anyway, there are all kinds of seeds you can buy from the farm manager. Each of these seeds will produce ingredients you would need for a particular kind of cooking recipe. And the way things work, each of the seeds would have a certain farming level requirement before you can grow them and they would all have varied growth durations before you can harvest them.
  • Watering Can - There are three sizes of watering cans, small (restores 100 water), medium (restores 1000 water) and large (restores 100000 water). These watering cans are used to replenish the "water reservoir" of the crop to prevent them from dying. And the way these watering cans work is sort of like HP and MP potions. Each time you use one of these watering cans, they will restore the said amount of water into the crop's "water reservoir".
In essence, the farming system kind of works like the popular Facebook App called "Farmville".
Dragon Nest - Farming Zone
Anyway, once you've bought the necessary items from the farm manager, you will then need to proceed to the portal as shown above to enter a farming zone. Although there are quite a few of these farming zones, it is shared with all the players of Dragon Nest so most of the time, you won't be able to find much space for you to grow your crops. Hence I need to remind you not to buy too many seeds or you will have trouble using them up.
Dragon Nest - Seed PlantingDragon Nest - Crop Status Window
Once you've managed to find an empty plot, click on it and the seed planting window will pop up. And upon selecting the seed to plant, you will then be able to see the current status of your crop as shown above. The last thing you would need to do is to watch over your crop and prevent it from dying due to a lack of water. You can do so by replenishing its water reservoir with a watering can.
Dragon Nest - Harvesting CropDragon Nest - Farm Storage
Upon finishing its growth cycle, the crop will then become ready for harvest. And after you've harvested the crop, it will then appear in your farm storage and stay there for 15 days before disappearing. To access this farm storage and retrieve your crop, just visit the "Farm Manager" which can be found in the same zone.

Watering Can Conversion Table
Watering CanTime increase in
smin, shr, min, s
Small10 s--
Medium100 s1 min 40 s-
Large10000 s166 min 40 s2 hrs 46 mins 40 s

Due to the difficulty in knowing how much water you will need for a crop, I have supplied the above conversion table for your ease. Basically, you will just need to know the difference in time between how long your water reservoir can last and the time until harvest. From there, you can roughly know the quantities and types of watering cans you will need to feed your crop with.

In the above example of the Red Beard Seed, there is a 6 second difference. This means that I need to add in water to sustain the crop for at least 7 seconds more. To do that, I can just use a small watering can and it will increase the time the crop's water reservoir can last by 10 seconds (which is more than enough time for the crop to fully mature).

If the time difference is in the range of minutes, I would suggest that you use the medium watering cans. And if its in the range of hours, the large watering cans would be your best bet. Although you technically just need enough water in the crop's reservoir to last 1 second more than it takes for it to mature, I would personally rather you add too much water into the crop's reservoir than adding too little and have the crop die.
Dragon Nest - Wild Sweet Potato Test
The above screenshot is a small test I did. I had added just enough water to the crop's reservoir so that it lasts just as long as it took to mature but in the end, the crop failed to mature and still died instead.

Lastly, you can add in more water to the crop's reservoir so long as its current water amount is less than the maximum it can hold regardless of the size of the watering can (even if it means that it will overshoot the maximum). However, once it overshoots the maximum, you will not be able to add in any more water until it once again becomes less than the max.


Fishing
To do some fishing, you will first need to acquire a fishing rod and some bait from the Farm Manager outside of the farming zone (the one where you buy tools, seeds and recipes).
Dragon Nest - Secondary Skills
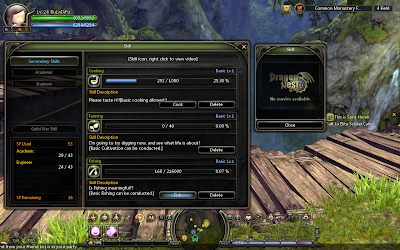
After purchasing some, head back into the farming zone and then move over close to the edge of the river. Next, open up your skills window and look for the "Secondary Skills" tab. Click upon the "Fish" button to initiate the fishing sequence.
Dragon Nest - Auto FishingDragon Nest - Manual Fishing
There are two kinds of fishing sequence, Auto and Manual. Auto fishing is great for leaving your character to fish without you watching over it while manual fishing's advantage is that you can fish faster.

As you can see, in both of the images, there is a yellowish bar that increases slowly. The moment it fills completely, your character will then be allowed to pull the fishing rod up and obtain any fish or item (if any). For auto fishing, this will be done automatically while manual fishing would require that you right click on the mouse to do so. At any point in time, you can switch between the two fishing sequences via the button in the middle of the fishing window, but please note that when you do so, you would lose any progress you had on the yellowish bar.

The tip to increasing the rate at which this yellowish bar progresses (while fishing manually) is to watch out for the second bar below it. While this second bar is increasing, whenever you click and hold the left mouse button, the progress on this second bar will stop and start to decrease instead.

And on this second bar, there are three zones, two blue (left & right-most) and one red (middle). So the aim is to time when to click and hold the left mouse button, so as to maintain the progress within this "red zone". The better you are at it, the faster the yellowish bar will fill up. And that's basically how the fishing system works.
Dragon Nest - Fishing District Signboard
But apart from knowing how to fish, you would also need to know where to fish in order to get the kinds of fishes you would need as ingredients for a particular cooking recipe. And to know that, you would need to find one of the signboards as shown in the above picture.
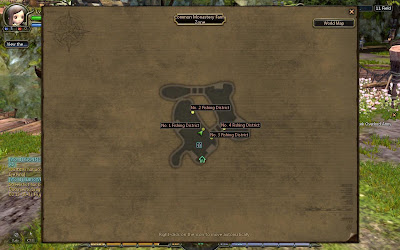
Dragon Nest - Fishing Zone Map
Basically, the whole farming zone has four fishing districts labelled No. 1 to No. 4. And each of these districts would hold their own kinds of fishes (which may or may not be in common).
Dragon Nest - First Fish ZoneDragon Nest - Second Fish Zone
Dragon Nest - Third Fish ZoneDragon Nest - Fourth Fish Zone
As you can see, there are three grades of fishes that you can get, "Magic", "Rare" and "Epic". In each of these three grades, there are a number of fish's names. Each of these names represents a different fish that is part of a particular cooking recipe.

The general idea is that you cannot control which particular fish you want to get. Additionally, you will require higher fishing levels in order to get a more decent chance of getting the rare and epic grade fishes. So in the end, you will just have to bring in tons of bait and then keep on fishing in order to get a decent quantity of the fish that you want as ingredients.

Cooking
Cooking, in my opinion, is most probably the easiest of the three activities. For once you've acquired all the necessary ingredients, all you have left to do is to click away mindlessly to produce the end product (food item).
Dragon Nest - Cooking UtensilsDragon Nest - Cooking Recipes
Before you can start cooking, you will first need to purchase some extra items (apart from the ingredients), namely, cooking utensils and cooking recipes. These items can simply be bought at the same farm manager which sells you your farming tools and seeds.
Dragon Nest - Add Dish
Next, you will then need to add the cooking recipes to your cook book. You can do so by calling out your secondary skills window (just like when you did for fishing). Now, click on the "Cook" button instead of the "Fish" button and then add the bought recipes to the list of dishes you can cook.
Dragon Nest - Cooking
After adding the recipes to your cook book, you may now proceed to making these dishes as long as you have the necessary ingredients in your inventory.
Dragon Nest - SeasoningDragon Nest - Salty Seafood Broth
My last word of advice for you with regards to cooking is to pay attention to the ingredients required. As far as I know, seasonings can be bought at the farm manager where you buy cooking utensils while broths need to be made via cooking.


Previous: Dragon Nest (Part Four)

Sunday, October 28, 2012

Dragon Nest (Part Four)


Equipment
Dragon Nest - Equipment WindowDragon Nest - Trading House
The equipment system in Dragon Nest is pretty simple and not as complex as that found in Magic Campus. In essence, almost all items found in the game are color-coded into 6 different "rarity or grades", "Normal" (White), "Magic" (Green), "Rare" (Blue), "Epic" (Orange), "Unique" (Purple) and "Legend" (Red). And naturally, the better the rarity of the item, the better the stats found on that item (with all other factors being equal).

In this system, the rarity of an equipment cannot be altered in any way and is determined right from the start (when it drops from a monster). With that being said, so how do you go about looting the better rarity items?
Dragon Nest - Epic Item Drops
As far as I know, for item drops of rarity "Epic" and below, the difficulty of the dungeon and your level compared to the dungeon monsters would affect their chances of dropping. Let us take for example, Sanctuary Core in Abyss Mode (as shown in the above picture).

If I didn't remember wrongly, the recommended level for Sanctuary Core in Abyss Mode was around level 24. And since I was around level 25 (according to the screenshot), the final boss monsters still dropped some epic items although somewhat lesser than when I cleared it at level 23 or so.

Conversely, when I did a Raiders Ambush Point in Abyss Mode (recommended level 15), there was totally zero epic item drops from the final boss monsters. All the items that do drop from them mostly consisted of rarity "Rare" and below. This is most probably because I was way "higher leveled" than the monsters found in that dungeon instance. As for items of rarity above "Epic", I would guess that they will drop from the tougher dungeons like the Dark Lairs or Nests (ones that would require a party to clear).

Now that you know about rarity of an item (which is something we cannot change), let us take a look at the things that we can change.
Enhancement Potential
Dragon Nest - Enhancing Venus BeretDragon Nest - Enhancing Success
Enhancement potential is merely the lingo for upgrading your equipment in Dragon Nest. If you take an item such as armor or weapon to the blacksmith in any major towns (Calderock or Saint Haven), you have an option to upgrade it as long as you bring him the necessary materials.

But as far as I know, the materials you need depends on the rarity of the item your upgrading and how "upgraded" it already is. Items of "Normal" and "Magic" rarity (and at low upgrades) may not require any jewels and just needs some in-game coins (gold, silver, copper). However, upgrading "Rare" and above items would require the use of jewels like agates and/or diamonds of various sizes (fragments, rough, ordinary, etc) and quantity depending on item and upgrade levels.

And like all upgrading systems found in regular MMOs, there is a chance to fail the upgrade as you enhance the item more and more. Generally, an item is guaranteed to upgrade to +3 without fail and can be safely upgraded to +6 without the risk of losing the item. And at +7 and above, the item will start to glow, but that is also when you will risk losing the item unless you use "Item Protection Jellies" found in the cash item shop. For an idea of the chances of success, please refer to Dragon Nest Equipment Enhancement.
Dragon Nest - Alloy GlovesDragon Nest - +1 Alloy Gloves
Initially, when the item is not yet upgraded, the "Enhancement Potential" section of the stats will not appear. Only when it has been upgraded at least once, will it appear. And as you upgrade it further, only the stats in the "Enhancement Potential" section will start to increase (while all other stats of the item remain as per normal).
Item being UpgradedStats Bonus (Enhancement Potential)
ArmorsMax HP & MP
WeaponsPhysical & Magic Attack Power
However, this is merely one of the ways to upgrade an equipment in Dragon Nest. There actually is another way of doing upgrades without the risk of losing your item or previous upgrades, albeit it being a more tedious process.
Dragon Nest - Spiral Code PouchDragon Nest - Vortex Code Pouch
If you take a closer look at the items that the "Blacksmith" NPC sells, you would ought to find a particular tab called "Enhance Code". In this tab, you will find two particular types of codes being sold, "Spiral Codes" and "Vortex Codes". For each of these types of codes, there exists a "Rare" version and an "Epic" version. The "Rare" version can be used to upgrade rarity "Rare" equipments while the "Epic" version is used to upgrade rarity "Epic" equipments.

The best part about these codes is that they upgrade your equipment with 100% success rate, although they do work under certain limitations. "Spiral Codes" only work to upgrade an equipment by +1 while "Vortex Codes" would upgrade an equipment up to the upgrade level of that code. Additionally, these codes would only work on equipments of "their levels" and "types".

For instance, if you open up a "Level 40 General Spiral Code Common Pouch" of rarity "Epic", you might perhaps get a +7 "Level 40 Spiral Code" for say a "Helmet". This spiral code would then be only usable on a +6 Level 40 "Epic" helmet and once used, the code would upgrade the said helmet to a +7. If it was a "Vortex Code" instead, then the code can be used on any Level 40 "Epic" helmet of below +7. And this vortex code will then upgrade the helmet to +7.

Interested in buying these codes now, aren't you? But just wait a sec and take a closer look at them first. The pouches holding a random +7 to +10 spiral or vortex code requires you to pay up with "Comet Dust" while the +11 to +14 versions requires "Sun Sparks". So what are these "currencies" and how do you get them?
Dragon Nest - Disassembler
Well, here's where this weird looking structure comes in...the "Disassembler". When you place ordinary, non-upgraded items into this "Disassembler", it will normally give you a "fail" message and nothing comes out. However, when you place rarity "Rare" and above equipments, which are upgraded to at least +6, into this "Disassembler", you will then obtain some "Comet Dusts" and "Sun Sparks".

As far as I know, the higher the level requirement, rarity and/or upgraded level of the equipment your disassembling, the more "Comet Dusts" and "Sun Sparks" you would get. And if your lucky enough and the item your disassembling is "precious" enough, you might sometimes get "Comet Tails" (exchangeable for 10k "Comet Dusts" per "Comet Tail" at "Blacksmith" NPC), "Sun Flames" (exchangeable for 10k "Sun Sparks" per "Sun Flame" at "Blacksmith" NPC) and "Spiral/Vortex Codes" from the process as well. For more information about the quantity you can get, please refer to Obtaining Dragon Nest Comet Dusts and Sun Sparks.

Hidden Potential
Dragon Nest - Hidden Potential
Another type of "upgrading" you can do to your equipment to improve its performance is to "unveil" its hidden potential. To do so, you will need to use another form of codes that works similar to the "Spiral" and "Vortex" codes you've seen earlier.
Dragon Nest - Low Grade Diamond CodeDragon Nest - Low Grade Technical's Agate Code
Basically, you can find three kinds of these codes, "Agate", "Crystal" and "Diamond".
  • Agate: Agate codes are used to reveal the hidden potential on armors.
  • Crystal: Crystal codes are used to reveal the hidden potential on weapons.
  • Diamond: Diamond codes are used to reveal the hidden potential on accessories.
And like the "Spiral" and "Vortex" codes mentioned earlier, these hidden potential codes also work with certain conditions. First of all, the hidden potential codes would only work upon equipments with the same rarity. Next, the level requirements of the equipment must be equal to or below that specified by the codes.
Dragon Nest - Using Low Grade Crystal CodeDragon Nest - Hidden Potential Unveiled
As long as these conditions are fulfilled, the hidden potential of the equipment will then be unveiled. However, the stats that do get applied upon the equipment is random and cannot be controlled. At best, the only thing you can do (if you dislike the stats applied) is to acquire a "Revert" Code to "wash away" the stats and then use another hidden potential code to get a fresh new set of stats.

Previous: Dragon Nest (Part Three)Next: Dragon Nest (Part Five)

Sunday, October 21, 2012

Dragon Nest (Part Three)

Titles
Dragon Nest - Titles
In Dragon Nest, one way of increasing the stats of your character is through the use of titles. These titles work in a similar fashion to the medals found in Dragonica. Both of them requires you to "equip" the title/medal in order to "activate" the bonus and likewise, you are only allowed to equip one of such title/medal at any point in time.

However, there is a slight difference as to how titles work in Dragon Nest. If you bring up the titles window as shown in the above picture, you will see that there is a "Cover Title" and an "Ability Title". A title placed in the "Cover Title" slot is only cosmetic (appears beside the name of your character) and will not affect the stats of your character in any way. On the other hand, a title placed in the "Ability Title" slot will add to the stats of your character if it provides any of such bonuses.
Dragon Nest - Combo Freak TitleDragon Nest - Master of Battle Title
Titles are gained in Dragon Nest in the same way as collecting medals in Dragonica. You will either need to complete certain quests or fulfill certain achievements/criteria before you will obtain them.

For example, to gain the title of "Combo Freak", you will need to perform at least 300 combos in a single dungeon instance. That means you will need to chain 300 attacks in one continuous flow without a pause. To gain the title of "Master of Battle", you will need to kill 20 monsters in a single strike/attack (I reckon that it can be done if you gather 20 low level monsters and use one single AOE skill to kill them off in one shot).

Heraldry
Dragon Nest - Enhancement PlateDragon Nest - Skill Plate
When out hunting in the dungeons, you will often come across all sorts of different plates. These plates may vary in types, level requirements as well as rarity.
Dragon Nest - Heraldry Crafting
In general, there are three types of plates, enhancement plates, skill plates and special skill plates. And from these plates, you can craft out their respective heraldries by gathering the necessary materials and then visiting the Heraldry Scholar in various towns.
Dragon Nest - Impact Enhancement HeraldryDragon Nest - Million Weight Hammer Skill Heraldry
Enhancement heraldry provides some sort of boost to your character's stats like strength, agility, ability to stun or paralyze others. Skill heraldry on the other hand provides a boost to a particular skill of your character. For example, increasing the damage of a skill by 10% or decreasing its MP cost or cooldown by 30%. Finally, special skill heraldry would bestow upon your character a new special skill like Hound Strike (one which you can cast in battles).

In terms of level requirements and rarity, the higher the level requirement and/or rarity of the plate, the resulting heraldry crafted will provide a stronger effect. However, not all of these plates can be easily found just by hunting in the regular dungeons.

As far as I know, Magic (Green) and Rare (Blue) grade plates are commonly found dropping from regular dungeon monsters out in the fields. The higher the level requirement of the dungeon and the harder the difficulty setting, the resulting plates that drop from the monsters will then be appropriately higher leveled and rarer.
Dragon Nest - Epic Special Skill PlateDragon Nest - Epic Skill Plate Pouch
Epic (Orange) grade plates, however, are much tougher to acquire. So far, I've only found that certain special dungeons or nests have them up as rewards for clearing them but I've yet to acquire one since these dungeons are very tough to clear alone.

As for epic skill plates, I have discovered that the heraldry scholars in towns do sell random ones placed in pouches. However, they are not up for sale using regular gold, silver and copper coins (the usual in-game currency) but rather costs varied amounts of "Fragments of Dimensional Gem".
Dragon Nest - Abyss ModeDragon Nest - Silver Dimensional Rabbit
These "Fragments of Dimensional Gem" are acquired by completing the regular field dungeons in "Abyss" mode. Upon finishing them, a dimensional rabbit will appear for you to loot and if you have in your inventory a "Key of Dimensional Box", it will then drop 25 of these fragments along with the usual loot when you click on it. If you do not possess such a key, then these fragments will not drop.
Dragon Nest - Heraldry Window
The heraldry window shown above is where you would equip those crafted heraldries that you've made out from the plates acquired. And as you can see, you only have a certain amount of slots to place heraldries in.

Ignoring the three boxes above the "Details" button and everything below it (have not discovered what they are for or whether they are already implemented into the game), you can see that the heraldry window can be divided into 4 quadrants.

In each of these quadrants, there are three boxes, two on the outside and one on the inside. The two boxes outside are for "Enhancement Heraldry" while the one on the inside is for "Skill Heraldry". The box found at the center of it all is where you would place a "Special Skill Heraldry".
Box TypeUnlocks at Levels
Enhancement10, 14, 18, 22, 26, 30, 34, 38
Skill16, 24, 32, 40
And as you progress and level up your character, each of these boxes will gradually unlock one at a time starting from the top left quadrant and moving in a clockwise fashion. But before you run off trying to collect heraldries to boost one particular stat or skill, you might want to know that the system limits you in such a way that you cannot equip more than one of the same kind of heraldry regardless of its difference in level and/or rarity.
Dragon Nest - Equipped HeraldryDragon Nest - Unequipping Heraldry
Lastly, at any point in time so long as you have an empty heraldry slot, you can just simply equip the appropriate heraldry right from your inventory. However, if you ever found a better heraldry and wish to swap it with an existing one, you can only do so at the heraldry scholars in towns. All you need to do is to pay a small sum of money to the heraldry scholar and ask him to unequip the unwanted heraldry and you can then put on the one you wanted as per normal.


Previous: Dragon Nest (Part Two)Next: Dragon Nest (Part Four)