Saturday, November 29, 2014

Defiance (Part Four)

Weapons
Of all the things in Defiance, I've found that the weapons are the most interesting aspect of this game.
Defiance - Weapons Galore 001Defiance - Weapons Galore 002
From rocket launchers to detonators, machine guns to sniper rifles, pistols, shotguns and even bio-magnetic guns to boot, there's simply so many of them out there that you'll literally be spoilt for choice. However, that's not all though...

Even between the same type of weapons, there can be quite a significant difference in how they work. Like for instance, some rocket launchers are guided while some require manual aim. Some detonators fire sticky rounds and some fire bouncy ones. There's rapid-fire shotguns and then there's the ones that need reloading after every shot. There's burst-fire assault rifles and there's also full auto ones.
With that many kinds around, it is definitely a MUST for you to try all of them out and find the ones that you work best with. But I've digressed and so lets get back to the point, shall we?
Defiance - Weapon Info
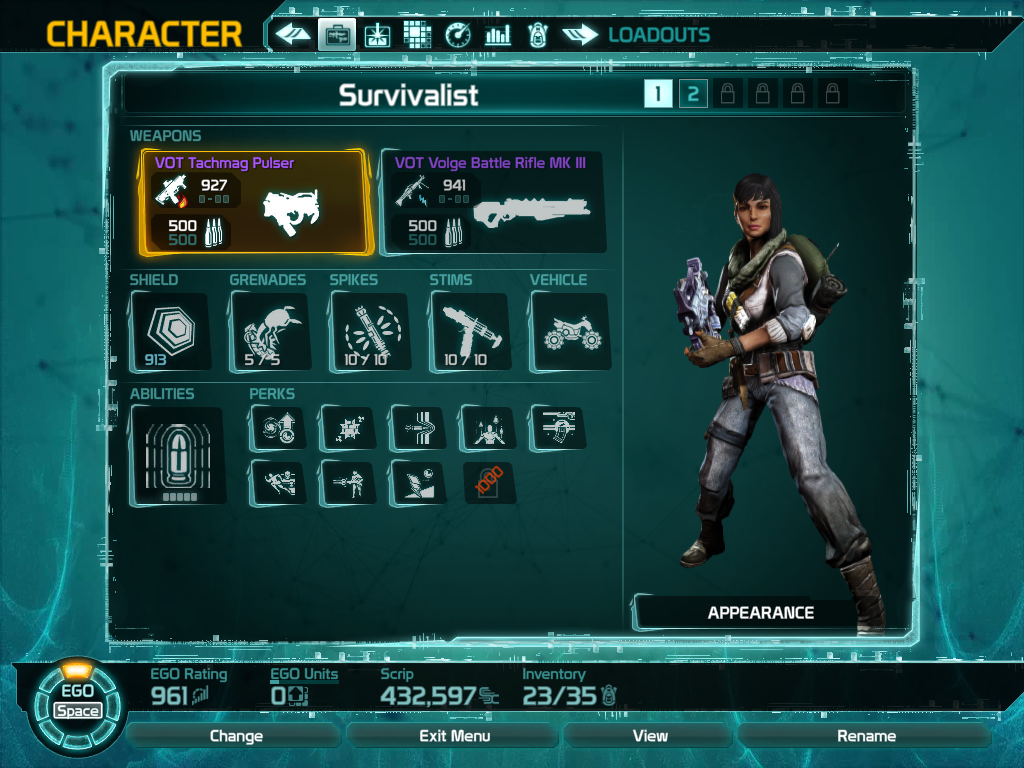
The above shows two random weapons that I own. And out of all the stuff that can be found on the weapon's info, the most important ones to takeaway are as follows.
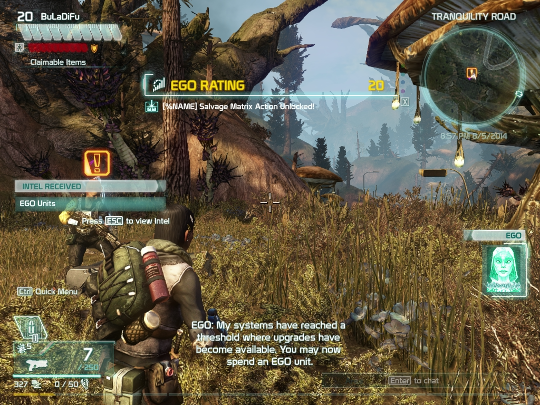
  • Encryption
    As far as I know, this tells you whether the weapon (or item) is encrypted or not. If it is, the weapon can no longer be upgraded in "rarity" (refer Salvage Matrix section on how to upgrade). However, an encrypted weapon will typically have a tiny bonus to their stats compared to one that is unencrypted (with all other things being equal).
    There are five ranks of rarity for any weapon or item found in Defiance. White represents the most common, Green represents uncommon, cyan equates to rare, purple means epic while orange depicts legendary. And just like in typical MMOs, the better the rarity, the better their corresponding stats...but the harder it is to find them too though.
  • Nano Effect
    Nano Effect modifies the type of damage that a weapon deals. Its like the elemental damages in typical MMO games. And just like in those games, it has its advantages and disadvantages (when used in certain scenarios) as well as its associated procs.
    NameEffectProc
    Defiance - Nano Effect Biological
    Biological
    Deals additional damage to armor plates.Places a black goo on the target, reducing its movement speed, jump capability as well as ability to deal damage.
    Defiance - Nano Effect Electrical
    Electrical
    Deals extreme damage to shields but little to health.Stuns the target for a brief moment, along with any other enemies nearby.
    Defiance - Nano Effect Incendiary
    Incendiary
    Deals extreme damage to health but little to shields.Lights the target on fire, causing additional damage over time.
    Defiance - Nano Effect Radiation
    Radiation
    Damage bypasses a portion of the target's armor.Covers the target in an effervescent and debilitating kinetic gel, causing it to take more damage (than usual) from attacks.
    Defiance - Nano Effect Syphon
    Syphon
    Part of the damage dealt is returned as healing.Tags the target with a purple swirl, causing life and shield energy to transfer from the target to the shooter.
  • Mod Slots
    Needless to say, mod slots are slots in which you may insert various sorts of mods into...to improve the stats of a weapon.

    There are four of these mod slots, Stock, Barrel, Magazine and Sight. And as you can see (from the Weapon Info pic), a weapon can randomly have none or up to four of these slots all unlocked.
    Defiance - Pistol Mod VendorDefiance - Automatic Mod Vendor
    The mods themselves can easily be acquired from their respective mod vendors like as shown (but will typically be of lower rarity), can be looted off monsters or gained as rewards from quests. However, what you must know is that there are certain "installation requirements" to obey.

    A pistol mod may only be installed on a pistol, rocket launcher mods on a rocket launcher, shotgun mods on a shotgun, sniper rifle mods on a manual/semi-automatic sniper rifle and automatic rifle mods on an assault rifle/submachine gun/light machine gun.
    I don't think its necessary to also mention that you can only install a stock, barrel, magazine and sight mod into their respective mod slots and nowhere else, right? Right?
    Defiance - Scope CommandoDefiance - Scope Tactical
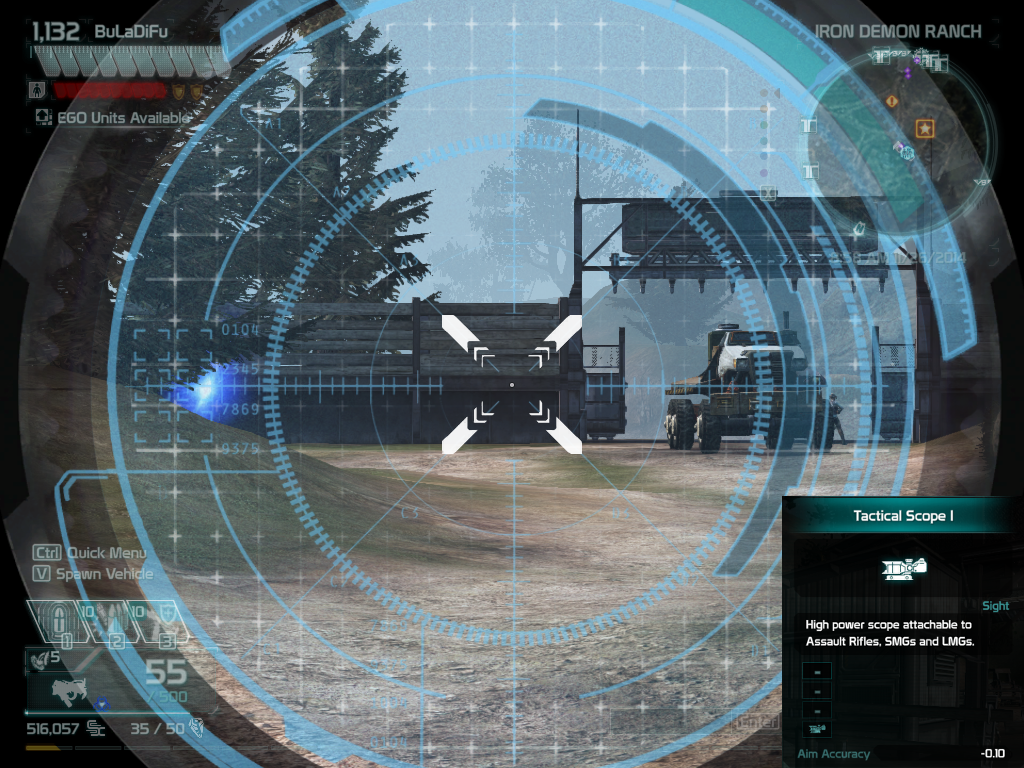
    While most of the mods only affect the stats and nothing else, you must especially take note of the sight mods though. These have different magnifications to them (depending on the mod's name) and they also tend to alter/change the look when you use the weapon to zoom in.

    In my opinion, you should match the sight mod according to the optimal range of your weapon instead of just randomly attaching any. Its pretty pointless to use a high magnification sight on a close-ranged weapon, don't you think so? Its damage will simply fall off too quickly to be of much use anyway.
  • Synergy
    Synergy is something that's very closely related to the mods that you insert into a weapon's mod slots. If a weapon has a certain type of synergy on it and you attach mods with the same kind of synergy into the weapon, you will be able to unlock the bonuses associated with that synergy (as shown on the weapon itself).
    The number in brackets beside the bonuses reflects the amount of mods (of that synergy) that you will need to install into the weapon in order to unlock the bonus.
    However, if the weapon does not have any synergy at all, then installing any kind of mods with a synergy into it is useless and actually wasted.
  • Mastery
    The purpose of this "Mastery" thingy is two-fold as far as I can tell.
    Defiance - Weapon Skills
    Firstly, it has got something to do with your "ability" to use any type of weapons...otherwise known as your weapon skills or weapon proficiencies.

    As you use a particular type of weapon to kill monsters, your skills in that weapon type will gradually increase and rank up. And with this increase in rank, you will gain all kinds of weapon skill bonuses whenever you use that particular type of weapon to kill stuff.

    However, the increase in your weapon skills is limited by this "Mastery" on a weapon. The gradual increase will only happen if you use weapons which you have not yet mastered. Once mastered, your weapon skills will cease to increase (if you continue to use this mastered weapon).

    That is why you will need to change your weapons ever so often in order to facilitate the ranking up of your weapon skills. At least until you've hit the maximum of level 20 and have unlocked all the weapon skill bonuses (for that weapon type).

    Secondly, once you've maxed this mastery on a weapon, the weapon will also gain a random mastery bonus. But unlike the weapon skill bonuses, which are applicable to all weapons of the same type, this mastery bonus applies only when your using the mastered weapon itself.
  • Weapon Bonus
    These are random modifiers that affect the stats of a weapon and makes them fundamentally unique from one another. The number of these modifiers that a weapon may have is dependent upon the rarity of the weapon.
    A "Rare" weapon can have up to three of these (one white, one green and one cyan), an "Epic" may have up to four (one white, one green, one cyan and one purple) while a "Legendary" would have up to five of them (one white, one green, one cyan, one purple and one orange).
  • Weapon Stats
    These roughly tells you how well the weapon can perform. However, from what I've noticed, they aren't exactly that helpful to be honest and may sometimes misguide you in certain situations.
    Defiance - Weapon Stats
    For instance, take the two submachine guns above. The VOT Pulser shows a lower rate of fire than compared to the FRC Sub-Carbine and so one would think that the sub-carbine pumps out more rounds per second. However, if you really do take these two out for a spin, you would actually find that the pulser ends up firing at a faster rate instead...because the sub-carbine fires in burst mode instead of full auto.
    Defiance - Weapon Stats 01
    Now how about these two shotguns? Although they seem to have about the same reload speed, the FRC Berzerker Shotgun "appears" to reload faster and in one shot while the Blackened Hellfire Fragger requires a couple of "hand actions" to finish its reload.
    But the advantage is that the Fragger can interrupt its reload to continue firing while the Berzerker has to finish its reload action in order to resume fire.

Salvage Matrix
The following shows the "Salvage Matrix".
Defiance - Salvage Matrix
This is the place to go when you wish to tweak the equipment that you have. (Well...its usually just for your weapons and shields actually.)

For the most of this section, all you need to know about its uses are as follows.
  • Breakdown to Resources
    This option allows you to break down anything that is in your inventory into "Ark Salvage", a kind of resource that is needed when you mod things.
    But since there's already an abundance of it (Ark Salvage) when you hunt and loot monsters, this option is sort of redundant except for when your desperately in need of inventory slots and your too far away from an NPC Vendor.
  • Attach/Remove/Retrieve Mods
    These three options allow you to attach mods onto or remove and retrieve mods from a weapon.
    When attaching mods onto a weapon, what your doing is to insert the mod into the weapon (well, duh). However, if there is any existing mods in that slot, it will be overwritten.

    When removing mods from a weapon, what your doing is to clear the mod slots on a weapon. To this effect, all of the mods will be destroyed...although the weapon itself will be preserved.

    When retrieving mods from a weapon, what your doing is to take out the mods on the weapon. To this effect, all of the mods will be saved...but the weapon will be destroyed.
  • Add Mod Slots
    This option will usually appear for a weapon when it does not have the full number of mod slots (Stock, Barrel, Magazine, Sight). Each time you use the option, it will randomly add one more mod slot to the weapon until you've unlocked all four of them.
  • Upgrade Rating
    This option is used to keep the EGO Rating of your weapons and shields up-to-date with your character's. Each time you use this option, it will increase the EGO Rating of the item by 100.
    But because it uses a harder to obtain resource called "Arkforge", I would typically advise that you be selective in what you choose to upgrade.

    These "Arkforges" can be earned only if you perform very well (get high scores) in Arkfalls and Incursions.
  • Change Weapon Mastery Bonus
    This option allows you to reset the weapon mastery bonus that was given to a weapon that you've mastered...in order to re-roll for a new one.
    However, in doing so, I believe that you will need to level that weapon all over again though.
  • Upgrade Rarity
    This option is used to upgrade the rarity of your items by one rarity rank (eg. a rare item will become an epic). However, each item may only perform this upgrade once...upon which it will be encrypted and barred from future rarity upgrades.
    As it is a very costly feature to use (requires quite a hefty amount of arkforges), I would recommend using this on only the best items that you have (those that you can't live without).


Previous: Defiance (Part Three)

Friday, November 21, 2014

Defiance (Part Three)

Equipment Loadout
Below shows your character's equipment loadout interface. You can access this interface by pressing "L" on your keyboard.
Defiance - Equipment Loadout
This is the place you would go to in order to set what sort of weapons, shields, grenades, spikes, stims, EGO power and perks that you wish to bring with you to a battle.

Each loadout (1, 2, ...) acts like a "slot" and allows you to customize yourself with different equips...that are meant for you to handle the different kinds of situations that you may find yourself in.
Sadly though, if your "Free-To-Play", you will only have two of these loadout slots. But with the limited amount of items that you can carry (unless you purchase more of them), two slots is more than enough in my opinion. (You still need space to loot stuff, mind you...)
You could have loadouts that are optimized according to what you fight. For instance, Hellbugs only have HP and armor while Volge have shields, HP and armor. Hence, weapons that are suitable for killing hellbugs quickly might have a tougher time against Volges...with their shields put into the equation.

Or perhaps you could have loadouts which are made for the situations that you put yourself into. Like for example, setups that are good for PVE may not perform all that well when put into PVP situations. And because of this, it can be pretty tiring to have to manually switch things out to prep yourself for one or the other.
Defiance - Changing Loadout
Just note that this switching of equipment loadouts does have a minor penalty though. One will need to manually access this interface and click on the slot numbers to activate the switching. There is no "quick button" or "hotkey" for this.

Furthermore, during this switching of loadouts, your character will be immobilized for the entire duration until the completion of the switch (takes about one or two seconds, I believe).

Grenades, Spikes And Stims
Defiance - GrenadesDefiance - Spikes And Stims
Grenades, Spikes and Stims are support items to aid you in your battles. You should find a plethora of these if you just visit any of the supplies vendor.

However, do note that those that you will get there are of common or uncommon rarity only. Their stats and effects would typically be sub par as well.
The better rarity ones are mostly found as limited time offers (if sold in the vendors) or looted off monsters that you kill.
Defiance - Hatchling GrenadeDefiance - Spikes
There are different types of grenades, spikes and stims. Each of them are unique in their own way and offers vastly different effects.

You should take your time to find something which suits you (or your usual circumstances) best...as the situations in which those effects would be useful are different as well (depending on your style of play).

But generally speaking, grenades are useful for crowd controls, spikes are your stationary AOE "buffs" and stims only work on your own self.
To use them, all you need is to press the appropriate hotkeys. "G" allows you to throw a grenade, "2" uses one of your spikes and "3" is your stims.
Defiance - Grenade Charge
However, do note that these grenades, spikes and stims work on a "charge" system. Each time you use one, you will consume one of its "charges". You can only replenish these charges by looting their corresponding "charge" from monsters killed.
If you do not have any type of grenades, spikes or stims equipped, looting these won't replenish any of your charges at all.


Vehicle
Apart from "Fast Travel Points", vehicles are your primary mode of transport within Defiance. And as far as I know, there are only a couple of types of these vehicles...each with their own stat differences. The rest of them are merely color variances and would mostly hold the same kind of stats so long as they are of the same type.
Defiance - Vehicle VendorDefiance - Item Mall Vehicles
There are a few sources to acquire these vehicles from. Some of them can be bought with scrips (the in-game currency), some with "faction reputation" (earned via completing tasks for the faction) while others are bought from the in-game item mall (cash shop) using bits.

As you do not lose these vehicles even if you had them destroyed, they are (in my opinion) mostly of cosmetic purposes. Just buy what you can afford or is attracted to. The stats are of not much importance...unless your arsed about being the first to get somewhere (like arkfall or incursion spots).

Abilities And Perks
The following shows you your character's "EGO Grid". (Or at least a part of it.)
Defiance - EGO Grid
The huge square in the middle is an "Ability" or "EGO Power" (one of the four available) whilst the smaller squares are "EGO Perks".

Basically, the idea is for you to fight, kill monsters or enjoy whatever other game features that are available...to try and earn XP points for your character. The XP points earned will then be used to fill up the "EGO Units" bar. And whenever you've manged to do so, you will gain one "EGO Skill Point".

You can then use these skill points to unlock new abilities and perks or improve existing ones. However, the rule that you will have to conform to is that you may only unlock abilities and perks that are adjacent to your existing (unlocked) ones.
Defiance - DLC Perk
And as far as I know, there should be enough points available for you to unlock and max everything. But do note that certain perks might be DLC only. You will need to purchase the appropriate DLC packs to acquire the right to learn them.
Your character will always start with one of the four EGO powers (of your choice). You will have to work your way (from there) to unlock the others.
Defiance - Ability Perk Slots
To further explain, an "EGO Power" is something which you equip into the "Ability" slot in your equipment loadout to allow your character to perform or use the specified power (press "1" on your keyboard to use).
  • Decoy - An EGO Power that sends out a mirror image of you. Press the Power button again to swap places with the decoy.
  • Cloak - An EGO Power that makes you invisible to enemies for 15 seconds. Cloaking activates immediate shield regeneration.
  • Overcharge - An EGO Power that increases weapon damage for 10 seconds. When activated, it instantly reloads your current weapon.
  • Blur - An EGO Power that boosts your movement speed by 50%. While active, your melee attacks deal full damage against shields.
As there is only one of these slots, your character can naturally only choose to use one of it at any point in time.

"EGO Perks" on the other hand are typically stuff that you equip into the "Perk" slots (also in your equipment loadout) to give your character some kind of added bonuses. These bonuses may include boosts to your character's defense, faster reloading speeds, increased duration to your EGO Powers and other whatnots.

However, these bonuses can be always active or they may be situational (requires certain conditions to trigger).
  • Deadly Cascade - You deal bonus damage for every additional enemy caught in an explosion.
  • Fortitude - Increase your health.
  • Pumped Up - Fully reloading a weapon recharges your EGO power.
  • Overload - While Overcharge is active, you reload faster.
  • ...
As there are only nine of these slots, you should ought to take your pick carefully and make sure that the perks compliments each other, with your chosen EGO power and style of play.
Perk slots are unlocked by getting your character's EGO ratings to the corresponding levels indicated. And as far as I know, your EGO ratings is dependent on how much of the game's content you've experienced. The more variety of content that you've played and enjoyed, the higher your EGO ratings.

Previous: Defiance (Part Two)Next: Defiance (Part Four)

Friday, November 14, 2014

Defiance (Part Two)

Defiance Gameworld
Defiance - Tutorial StartDefiance - Vehicle Attained
Immediately once you've started (after creating your character), you will be thrown right into watching a cutscene which accounts for everything that had happened to you...right until the point where you start your tutorial within the game.

All you need to do at this point in time still is just to follow through with the tutorial and the missions up until the point where you get your first vehicle. After that, its practically free rein all the way and you can do whatever you want to.
However, that's not the focus of this section and hence I would recommend that you kick back and enjoy the ride that was offered.
Defiance - Ingame World Map
Anyway, the Defiance gameworld is actually made up of a singular, massive and contiguous terrain. And within this terrain, all sorts of various missions, tasks and quests are then littered over the entire landscape.
For quicker and easier access, it is recommended that you first unlock all the "Fast Travel" points located within the gameworld (by getting yourself there at least once). This will allow you to warp to a closer position before driving yourself to the point of interest.

To warp, just open the map and click on the fast travel point that you wish to go to.
Defiance - Main MissionDefiance - Episode Mission
There's the main storyline mission that you can partake in, episode missions and side missions. Each of these tells a story of its own and adds flavor to the game.
The Main Mission is the one which will bring you all over the gameworld and lasts the longest out of the three. Episode Missions are shorter, but would still bring you through quite a few places as well as lasts a few sessions. Side Missions are the shortest and usually occurs around the vicinity at which you've picked it up.
Defiance - TimeTrial Rampage Hotshot
Then there's other extra activities that you can try out for fun like "Hot Shots", "Time Trials" and "Rampages". These, I believe, are mostly for fun stuff that you enter to try and see if you could score the highest or clock the fastest time to leave your name on the rankings scoreboard (Top 3 Only).
Hotshots give you a limited amount of ammunition but no time limit. You should aim to get the highest score by chaining your kills and keeping your multipliers up. It will end once your ammo finishes.

Rampages, on the other hand, offer you more than enough ammo for the challenge, but you will need to kill as many enemies as you can within its time limit.

Time Trials require you to complete a vehicle race course within the shortest time possible. The actual racing occurs within the live, open gameworld and hence you will often encounter NPC mobs or other players even whilst doing your run.
Defiance - Arkfall MutantsDefiance - Incursion Volge
If you get bored, there's also "Arkfalls", "Incursions" and "Sieges" for you to participate in. All these work in pretty much the same way...except for the monsters that you kill on the spot being different. However, there's one particular difference to note.
Defiance - Minor ArkfallDefiance - Major Arkfall
Apart from Sieges, Arkfalls and Incursions can come in varying degrees of danger. There's minor and regular ones which typically occur randomly all over the place, but always alone. And there's major ones which comprises of multiple regulars concentrated within a particular area or zone.
Defiance - Dark Matter MonolithDefiance - Scrapper Progenitor Core
For these major ones, if you proceed to clear all arkfalls and incursions that are within this particular area, you will get to spawn and fight a "Boss Mob" at the end of it all.
Is it just me, or does it sound kindda like RIFT Online?
Defiance - Matchmaking
Finally, should you still desire something else to do entirely, you can also look for any Matchmaking NPCs (like the one above) to participate in Co-Ops, Co-Op Arenas (requires at least one of you, within the group, having the appropriate DLC pack or so I've heard), Competitive Matches and Shadow Wars.
Defiance - Co-OpDefiance - Shadow War
As far as I know, the Co-Ops are pretty much like instanced dungeons where you can cooperate with other players (in a team) to fight against environmental (NPC) mobs. There is usually a "Boss Mob" as well towards the end of the dungeon run.

The Competitive Matches and Shadow Wars are for players itching for PVP fights. And the difference between the two is that one's instanced (Competitive) and occurs on a smaller scale (8 vs 8 and 16 vs 16, I believe) while the other happens within the open gameworld itself (Shadow War) and is on a much grander scale (up to 64 vs 64).

Game Interface
Defiance - Game Interface
The above shows your typical heads-up display (HUD) within the game. The top left corner tells you some of the important info with regards to your character status while the top right is where your mini radar's positioned. The bottom left shows you some simplified data about your current equipment setup and the bottom right's your chat window.
Its pretty much your standard FPS HUD as far as I can tell.
However, there are still certain things to note in this HUD which requires further explanation.
  • EGO Rating
    The EGO Rating is kindda synonymous to your "character level" in regular MMO games. In a way, it represents how "powerful" your character is compared to another player.
    This rating here also acts in concert with the one found on your equipment's (weapon and shield)...so much so that you can only equip yourself with something that is at or below your current (non-boosted) EGO Rating. But as equipment that you loot will always be "at your level" anyway, you won't usually encounter this kind of problem unless you've bought that item via a PVP trade (another player with a higher EGO rating, I suppose).
    However, as there is a "balancing mechanism" in place which will "boost" the handicapped player's EGO ratings (both character and equipment's) up to the proper levels, this practically removes any potential disadvantages which the player might have and thus isn't that much of an issue I guess.
    So long as the player keeps the EGO Ratings of his or her weapons and shields up-to-date (with their character's) that is...
    Defiance - Damage Within Activity AreaDefiance - Damage Outside Activity Area
    Just note that the boost will only be applied if the player stays within the designated area for the activity. Once he or she goes out of it, their EGO ratings will immediately drop back to their original levels and you will see a very significant difference in damage capabilities as well as ability to survive hits from those that are still within it.
  • Shields
    The shields are your "buffer" which takes the brunt of the damage. Only when the shields are gone...will there be any damage done to your character's HP (in most situations anyway).
    Defiance - Respark II Shield
    By avoiding damage for a sufficient amount of time, you will be able to get your shields to recharge back to full. However, the rate at which your shields recharge, its capacity and the amount of time you will have to wait before it starts...depends upon the shield that you've equipped.
  • Armor Plates
    The armor plates helps to reduce the amount of damage that you take on. The more armor plates that you have active, the less damage the enemy would be able to inflict upon you (10% damage reduction per active plate).
    The number of armor plates that you have also depends upon the shield that you've equipped...but there are certain mechanics within the game, "Perks", "Spikes" and "Stims" which can give you a temporary buff of armor plates.
    Defiance - Armor Plates Box
    As far as I know, these plates do not regenerate themselves. They appear to have a certain amount of durability and would break upon taking enough damage, thus becoming non-functional (no longer reduces damage). And if I remember correctly, the only ways to replenish them is to either visit an "Armor Plates Box" or use some "Armor Repair Stims".
  • HP
    Defiance - Incapacitated
    If unfortunately you've gotten your HP down to zero, instead of "dying" in typical MMO scenarios, you will simply just be "incapacitated".

    During this downtime, there are three options for you to revive your character. The first one involves getting another player that is still alive to revive you. The second one is for you to revive your own self by holding down on "E" (has a cooldown time to reuse though). The third one is to pay some in-game money and respawn yourself at the nearest "extraction point" (press and hold "T" or wait for timer to expire).
  • Revival Timer
    The revival timer is the one which controls whether you can revive your own self when your incapacitated. If this timer is still in the process of filling up, you will not be able to revive by yourself and can only use the other two methods available.
  • Current Activity Tracker
    Defiance - Activity Reward
    This keeps track of the progress in your current activity as well as your overall score in the activity. The higher your score, the better your rewards will be at the end of the activity.
    Everything that you do within the activity will count and give you some points to add to this score...be it damaging and killing monsters or simply just healing and reviving fellow players.


Previous: Defiance (Part One)Next: Defiance (Part Three)