 Friday, November 21, 2014
3:19 PM
Friday, November 21, 2014
3:19 PM
 BuLaDiFu
Equipment Loadout
Below shows your character's equipment loadout interface. You can access this interface by pressing "L" on your keyboard.
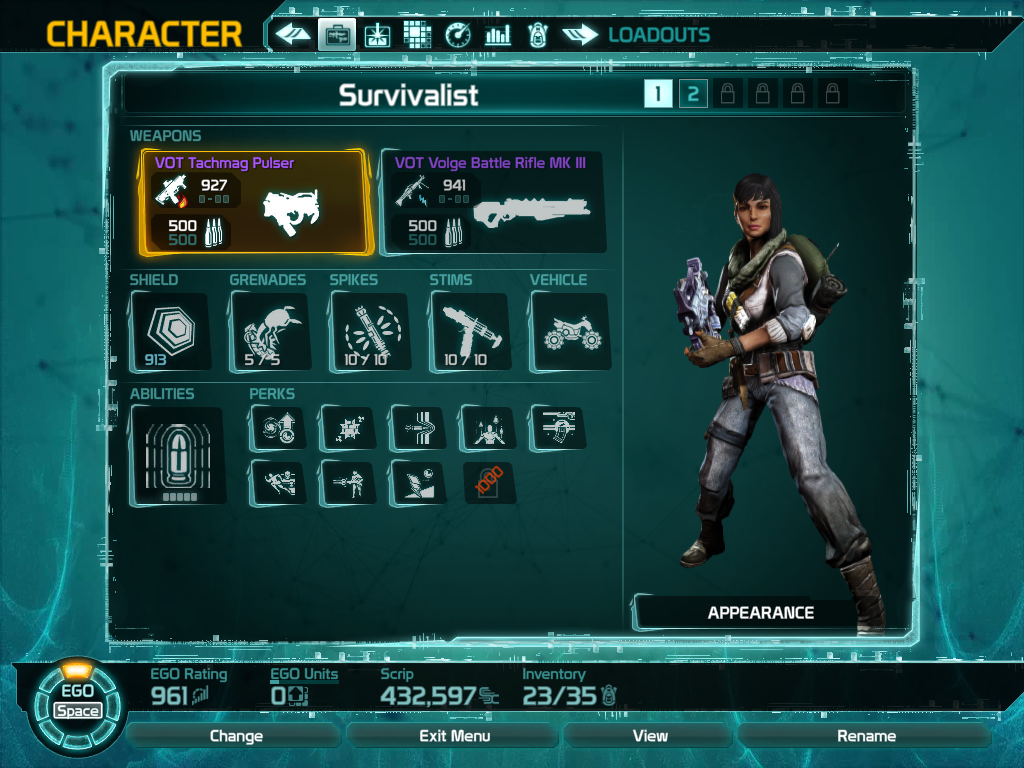
Each loadout (1, 2, ...) acts like a "slot" and allows you to customize yourself with different equips...that are meant for you to handle the different kinds of situations that you may find yourself in.
Sadly though, if your "Free-To-Play", you will only have two of these loadout slots. But with the limited amount of items that you can carry (unless you purchase more of them), two slots is more than enough in my opinion. (You still need space to loot stuff, mind you...)You could have loadouts that are optimized according to what you fight. For instance, Hellbugs only have HP and armor while Volge have shields, HP and armor. Hence, weapons that are suitable for killing hellbugs quickly might have a tougher time against Volges...with their shields put into the equation.
Or perhaps you could have loadouts which are made for the situations that you put yourself into. Like for example, setups that are good for PVE may not perform all that well when put into PVP situations. And because of this, it can be pretty tiring to have to manually switch things out to prep yourself for one or the other.

Furthermore, during this switching of loadouts, your character will be immobilized for the entire duration until the completion of the switch (takes about one or two seconds, I believe).
Grenades, Spikes And Stims
 |  |
However, do note that those that you will get there are of common or uncommon rarity only. Their stats and effects would typically be sub par as well.
The better rarity ones are mostly found as limited time offers (if sold in the vendors) or looted off monsters that you kill.
 |  |
You should take your time to find something which suits you (or your usual circumstances) best...as the situations in which those effects would be useful are different as well (depending on your style of play).
But generally speaking, grenades are useful for crowd controls, spikes are your stationary AOE "buffs" and stims only work on your own self.
To use them, all you need is to press the appropriate hotkeys. "G" allows you to throw a grenade, "2" uses one of your spikes and "3" is your stims.

If you do not have any type of grenades, spikes or stims equipped, looting these won't replenish any of your charges at all.
Apart from "Fast Travel Points", vehicles are your primary mode of transport within Defiance. And as far as I know, there are only a couple of types of these vehicles...each with their own stat differences. The rest of them are merely color variances and would mostly hold the same kind of stats so long as they are of the same type.
 |  |
As you do not lose these vehicles even if you had them destroyed, they are (in my opinion) mostly of cosmetic purposes. Just buy what you can afford or is attracted to. The stats are of not much importance...unless your arsed about being the first to get somewhere (like arkfall or incursion spots).
Abilities And Perks
The following shows you your character's "EGO Grid". (Or at least a part of it.)

Basically, the idea is for you to fight, kill monsters or enjoy whatever other game features that are available...to try and earn XP points for your character. The XP points earned will then be used to fill up the "EGO Units" bar. And whenever you've manged to do so, you will gain one "EGO Skill Point".
You can then use these skill points to unlock new abilities and perks or improve existing ones. However, the rule that you will have to conform to is that you may only unlock abilities and perks that are adjacent to your existing (unlocked) ones.

Your character will always start with one of the four EGO powers (of your choice). You will have to work your way (from there) to unlock the others.

- Decoy - An EGO Power that sends out a mirror image of you. Press the Power button again to swap places with the decoy.
- Cloak - An EGO Power that makes you invisible to enemies for 15 seconds. Cloaking activates immediate shield regeneration.
- Overcharge - An EGO Power that increases weapon damage for 10 seconds. When activated, it instantly reloads your current weapon.
- Blur - An EGO Power that boosts your movement speed by 50%. While active, your melee attacks deal full damage against shields.
"EGO Perks" on the other hand are typically stuff that you equip into the "Perk" slots (also in your equipment loadout) to give your character some kind of added bonuses. These bonuses may include boosts to your character's defense, faster reloading speeds, increased duration to your EGO Powers and other whatnots.
However, these bonuses can be always active or they may be situational (requires certain conditions to trigger).
- Deadly Cascade - You deal bonus damage for every additional enemy caught in an explosion.
- Fortitude - Increase your health.
- Pumped Up - Fully reloading a weapon recharges your EGO power.
- Overload - While Overcharge is active, you reload faster.
- ...
Perk slots are unlocked by getting your character's EGO ratings to the corresponding levels indicated. And as far as I know, your EGO ratings is dependent on how much of the game's content you've experienced. The more variety of content that you've played and enjoyed, the higher your EGO ratings.
| Previous: Defiance (Part Two) | Next: Defiance (Part Four) |
 Posted in: Defiance

