Friday, September 26, 2014

Entropia Universe (Part Eight)

Gameplay (Continued)
The Paying Activities
  • Mining
    Entropia Universe - Mining
    Mining is basically a ped-spending activity whereby you run around the surface of a planet (or map area), looking for "Ores", "Enmatters" and/or "Treasures" (can only be done on Planet Arkadia).
    Entropia Universe - Finder Excavator Refiner Probe
    To do this, you will need to have a "Finder", an "Excavator", a "Refiner" and some "Probes".

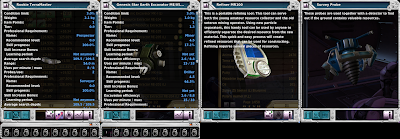
    The finder is the tool used to search for mining claims while the probes are your "ammunition" for the search. The excavator is used to dig up the claims (if you find any) and the refiner is used to "convert" the stuff from their raw forms into the refined version...for use in crafting.
    • How Mining Works (Roughly And With A Dash Of Speculation Involved)
      Entropia Universe - Finder Window
      All you need to do here is to equip the finder, select what sort of claims (Ores, Enmatters and/or Treasures) your gonna be looking for and then activate it. It will then consume the necessary amount of probes from your inventory and start the process of searching for claims.
      They kindda work in the same logic as you would with a weapon. (Requires "ammunition" to work and will decay when used.)
      Entropia Universe - No Resource FoundEntropia Universe - Resources Found
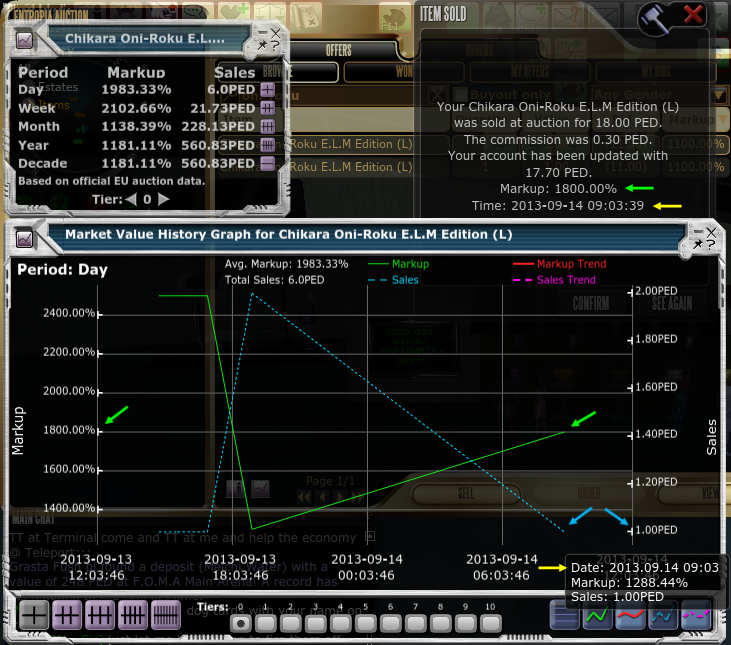
      Upon starting a search, you will either get a "No Resource Found" (NRF) outcome and lose your cost of searching (decay + probes). Or perhaps "hit" some claims (like as shown above) and probably get back some, all of your cost or maybe even more than that...much more. (Sounds just like hunting huh?)
      Claim hits appears to be separate for each of the types (Ores, Enmatters, Treasures), but ON AVERAGE, about 70% (or more) of your "drops/searches" will result in an NRF while perhaps about 30% (or lesser) of it will result in a hit (getting a claim).

      And from what I've heard, mining appears to be a "player against player" type of activity. If you find that your getting close to zero hits while combing an area, there's a good chance that someone might have visited (just recently) and cleansed the area of resource claims. Under such circumstances, it may be wise to consider perhaps moving to an entirely different area (to mine) or switch to a finder with some other "Average Search Depth" instead.

      Conversely, if your getting a good number of hits, it might probably be due to no one having visited the area in quite a while. But of course, this is only a hypothesis/rumor that I've heard. So take it with another pinch of salt.
      Entropia Universe - Drilling Resources
      After that, its just a matter of locating the "claim" and using your "Excavator" to extract out the resources. (Aim at claim, equip and operate the excavator until the claim is "depleted".)

      On very very very (note the keyword here) rare occasions, you might also stand a chance to find SOOTOs (Something Out Of The Ordinary). These can be very rare Ores and Enmatters (depending on what type you were searching for), "Beacons" ("keys" used to access special instances/dungeons on Planet Calypso) or stuff like armor parts and decorative art pieces/vases (if your mining for Treasures on Planet Arkadia).

      Sometimes (also very very very rare as well), if your lucky enough or had been using "mining amps", the claim that you've found could also be a "Tower". These are a special kind of mining claim (the claim marker will also look different and more like a tower) whereby the total TT Value of the stuff found within the claim (refer Deposit Sizes) is worth more than 4000 PEDs altogether.
      However, in such cases, you DO NOT get the entire 4000 PEDs (or more) worth of stuff in one shot (but you won't need to extract the resources out manually). They will be given out in batches I believe...and all you need to do is just to return to the tower and "empty" it periodically.
    • Finder Stats (Probe Cost, Range And Average Search Depth)
      Below are the stats of two typical finders that you may use while mining.
      Entropia Universe - Finder Stats Example
      The colored arrows show the corresponding stats which are relevant to the respective type of claims that you might be searching for when using the finder.

      If you are searching for Ores, then the stats you should be referring to would be those marked with "red" arrows. If Enmatters are what your searching for, then the stats you should look at are those marked with "yellow" arrows. If its Treasures your finding, then its those marked with "green" arrows.
      Apart from that difference, most of the other stats are pretty similar to what you would see on a weapon's...and thus requires no further explanation.
      Of these stats marked with arrows, the three most prominent ones which you must understand would be "Probe Cost", "Range" and "Average Search Depth".

      "Probe Cost", in the simplest of terms, tells you how many probes are consumed (by the finder) when you opt to search for that particular type of claim using the finder. For instance, if your searching for Ores using the Rookie Terramaster, it will consume 2 probes per search. But if you were to search for it using the Ziplex Z20 Seeker (L) instead, it would then cost you 20 probes (and not 2) per search.
      However, the "Probe Cost" is also representative of the "size" of the deposit that you "may" find. For example, if the "Ore" claims that you find using the Rookie Terramaster is worth X PEDs (ON AVERAGE), then those that you find using the Ziplex Z20 Seeker (L) would be worth ON AVERAGE, 10 times of X PEDs (since its probe cost is 10 times more).

      By the same "logic", if you were to use the same finder to look for all three types of claims (Ores, Enmatters and Treasures), then ON AVERAGE, the "Ore" claims would be worth 2 times that of the "Enmatter" claims while the "Treasure" claims would be worth 3 times that of the "Enmatter" claims.
      "Range", reflects the maximum search radius of the finder. The generally accepted hypothesis is that, if you search for a claim at a particular spot, the finder will only attempt to look for claims, in a circular area (centered about that spot) and with a maximum search radius of that indicated by the finder.
      And by this hypothesis, a finder with more range is deemed to have a higher chance of finding a claim than compared to one with less range (since it will have a larger search area). However, whether the range has an effect upon the "size" of the claim is...unknown (at least to me).
      If there were to be multiple claims (of the same type that your searching) within the finder's search area, it is generally reckoned that the one "closest" will be found and claimed first. Subsequent claims can only be discovered by performing another search attempt.
      As such, a good handful of players would actually do another search if they happen to find a claim that is very close to them (maybe about within 10 to 15 meters). This is because, there's a good chance that there might be another claim within the "leftover unsearched area".

      Naturally, it is also advised that you should not "overlap" search areas when looking for claims...as that will result in poor "cost-efficiency".
      As for "Average Search Depth", this is typically just a stat that reflects the "average depth" of the claims that you will find with the finder. What this means is that, if you note down the depths of all the claims that you've found using a particular finder and averaged them, you will end up getting a number that is very close to this "Average Search Depth" of the finder.
      As to the specific effects of this stat, not much is known about it...whether it will have an effect on your chances of finding a claim (or not) and whether it will have an effect on the claim size (or not).

      But what is reasonably assumed is that...it will have an effect on what sort of Ores, Enmatters or Treasures that you will be able to find using that finder.
    • Targeting Specific Ores, Enmatters And Treasures
      Albeit random and mostly depends upon the game servers, there is still a way to "target" for specific resources with a certain percentage of confidence. (Very useful when your out looking for certain resources...like those with high markups or simply just something that you might need for crafting.)
      Cool! What will I need?
      To be honest? Nothing much...apart from your mining tools and this website, Little Big Mining Log.
      But how do I use it?
      Simple. Let's say that you were on Planet Arkadia (that day) and wanted some "Star Dust" to craft some weapons (but didn't feel like buying them off auction).
      Entropia Universe - LBML Resource Distribution Map
      So what you can do is to go to LBML, "Maps" and look for the right map that is showing Planet Arkadia's terrain (like as shown above).

      From there, look for "Star Particles" (which is the unrefined version of "Star Dust") and locate which are the appropriate sectors that might have them...and what their respective percentages are. (For your convenience, I have underlined them in "red" so that you can see them.)
      Entropia Universe - LBML Star Particles Depth
      Next, you will have to go back to the homepage and look for the "depths" at which "Star Particles" had been found before (refer to the "Resource Depth" table).
      According to it, there were a total of 2024 "Star Particles" claims found in the past 90 days. The shallowest claim found was at 97 m while the deepest claim found was at 1265 m. But on average, the claims are mostly found at a depth of about 677 m.
      Then equip yourself with a finder that has an "Average Search Depth" of about 677 m (if possible) and head to those sectors to search for "Star Particles" claims.
      You should have a roughly 13% chance of finding "Star Particles" at the greenish forest sector (middle left) and a roughly 20% chance at the desert one (bottom left).
    • Calculating Cost of A Mining Search
      Its actually pretty simple to find out the cost of a mining search. All you need is just the decay cost of the finder and its probe cost.
      Ziplex Z20 Seeker (L)
      Decay Cost: 1.452 PEC
      Probe Cost: 20 Probes (Ore), 10 Probes (Enmatter), 30 Probes (Treasure)
      Cost of One Probe: 0.05 PED
      For instance, if you were to use the Ziplex Z20 Seeker (L) to look for ore claims only, your cost of the search would amount to (20 x 0.05 PEDs) + 0.01452 PEDs = 1.01452 PEDs.

      If you were to use the same finder, but to look for all three types of claims, then your cost of the search would amount to (60 x 0.05 PEDs) + (3 x 0.01452 PEDs) = 3.04356 PEDs instead.
      This, however, does not take into account the markup at which you've bought the finder at. Its only the pure TT cost.
    • Mining Amps (Attachment)
      Entropia Universe - Mining Amp Examples
      The above are stats of two typical mining amps which you may use on finders while mining. (To use, just drag and drop the mining amps onto the finders, just like regular attachments.)

      And while the specifics aren't exactly known, what we do know is that usage of these mining amps are to typically "boost" the deposit sizes of claims which you may find.

      The way they work is such that the decay of the mining amp used is treated like "extra probes"...so much so that the size of a claim that is found, will be "amplified" proportionately by that extra "probe expenditure".
      Level 1 Finder Amplifier Light (L)
      Decay Cost: 25 PEC (worth the cost of 5 probes)

      Terra Amp 6 (L)
      Decay Cost: 600 PEC (worth the cost of 120 probes)
      For instance, if you've used both these mining amps upon the Ziplex Z20 Seeker (L) to look for ore claims only, then ON AVERAGE, ore claims found with the Level 1 Finder Amplifier Light (L) attached will be about 1.25 times more than when unamped (not using any mining amps). For ore claims found with the Terra Amp 6 (L) attached, the claims would be ON AVERAGE 7 times more than when going unamped.

      If you've used both of these mining amps upon the same finder, but was searching for treasure claims instead, then ON AVERAGE, treasure claims found using the Level 1 Finder Amplifier Light (L) attached will be about 1.1667 times more than when unamped. For treasure claims found using the Terra Amp 6 (L) attached, the claims would be ON AVERAGE 5 times more than when going unamped.
      Usage of these aren't really recommended (unless you know what your doing). You will usually need to find resources with an averaged markup of more than that of the mining amp's markup to "justify" the using of it. Else, you are more likely to be losing PEDs than not.
    • Excavators
      Below are the stats of two typical excavators.
      Entropia Universe - Excavator Examples
      Although not much is necessary to explain the usage of these (just point and click), there is some tiny info you will need to know about them. And that is the "Excavation Efficiency" stat.

      From what I believe, these actually affects the "efficiency" at which you pull resources out of a claim. The higher the efficiency value, the more resources you'll pull out per click.

      For instance, if you were to have a very large ore claim to extract and had the option to use either of the two excavators shown (and at maxed out stats on both), then in theory, the "Adapted Resource Extractor RE-204 (L)" would require less number of clicks to finish extracting the claim while the "Genesis Star Earth Excavator ME/05, SGA Edition" would require more clicks (Excavation Efficiency of 12.8 vs 8.8).

      However, this does not take into consideration the "decay per use" of each of the excavators. Or in short, its cost-efficiency.
      Genesis Star Earth Excavator ME/05, SGA Edition
      Excavation Efficiency: 8.8
      Uses/Min: 33
      Decay: 0.8 PEC
      Efficiency/PEC: 11.00
      Efficiency/sec: 4.84

      Adapted Resource Extractor RE-204 (L)
      Excavation Efficiency: 12.8
      Uses/Min: 34
      Decay: 2.331 PEC
      Efficiency/PEC: 5.49
      Efficiency/sec: 7.25
      If we were to consider the cost-efficiency ("Efficiency/PEC"), then obviously it would be wiser to use the "Genesis Star Earth Excavator ME/05, SGA Edition" instead.
      Ideally, one would opt to use a cost-efficient excavator if time is not a factor. If however, the claim were to be in a PVP-lootable zone and extraction needs to be fast and quick, then obviously one should value the "Efficiency/sec" factor more and just ditch the "Efficiency/PEC" factor.
    • Refiners And Refining Costs
      Entropia Universe - Refiner Examples
      The above are examples of two typical refiners. One's easily purchasable from the local Trade Terminals on Planet Calypso while the other's a crafted refiner.

      And although both functions in exactly the same way (just equip, activate it and throw in the unrefined resources to refine them), there is a very minute difference between using the two of them. That is...their decays are different and so are the costs of using them to refine resources.
      What!? What do you mean?
      Entropia Universe - Refining Examples
      To illustrate my point, let us take a look at the above examples.

      From left to right, I am refining 130 Crude Oil (Unrefined Enmatter) into 65 Oil (2:1 conversion rate), 162 Lysterium Ore (Unrefined Ore) into 54 Lysterium Ingot (3:1 conversion rate) and 551 Force Nexus + 551 Vibrant Sweat into 55155 Mind Essence (roughly 1+1:100 conversion rate).
      Note that the excess will be left untouched and returned to you at the end of the process, so you don't need to purposely feed it with exact numbers.
      And the way these refiners work is such that each "conversion" will cost the refiner being used...that amount of PECs...as indicated by the refiner's decay (and will be deducted accordingly from its TT Value).
      Refiner MR100
      Decay: 0.031 PEC

      Transformer T-104
      Decay: 0.023 PEC
      If I were to use the "Refiner MR100" for the above examples, then my costs would have been 2.015 PECs (65 x 0.031) for the crude oil conversion, 1.674 PECs (54 x 0.031) for the lysterium ore conversion and 17.081 PECs (551 x 0.031) for the Force Nexus + Vibrant Sweat conversion.

      If I were to use the "Transformer T-104" instead, then my costs would have been 1.495 PECs (65 x 0.023) for the crude oil conversion, 1.242 PECs (54 x 0.023) for the lysterium ore conversion and 12.673 PECs (551 x 0.023) for the Force Nexus + Vibrant Sweat conversion.

      Capisci?
      Overall, I will be saving about 8 PECs for every 1000 conversions performed using the T-104 (instead of the MR100).

      Not a very big sum, but in the long run...if your a very heavy miner...then it should be worth it I guess.
    • Indoor Mining Logic
      With regards to this, I must inform you that the "conditions" for mining isn't really THE SAME regardless of where you are at. Certain specific places like FOMA, Hell (Planet Rocktropia) and Arkadia Underground (Planet Arkadia) actually utilizes a slightly different set of mining rules than compared to mining "planetside" (the other "regular" areas not mentioned).

      These set of rules, commonly known as the "Indoor Mining Logic", vastly alters the conditions of mining by SO MUCH...that it actually becomes a totally different experience altogether when you mine there.

      In such an area, your finder's "Range" stat is actually reduced to 40% of its "normal range". And as such, your hit rate (chances of finding a claim) is very much reduced to a tiny percentage (about 5% to 10% maybe?).
      However, because of this "handicap", the TT Value of claims found there is also significantly much larger than compared to your regular ones found planetside. (ON AVERAGE.)
      Its basically a place that's visited solely by professional miners, miners with "deep pockets" (a lot of PEDs) and miners armed with mining amps...looking for a gambling shot (at hitting high TT Value claims).
      I would highly caution against going to such an area unless your willing to lose your PEDs...and lose A LOT I tell ya.
      As far as I know, the system doesn't appear to warn you when you've stepped into such an area (with the indoor mining logic applied). The only way to identify them is by checking your finder's stats when your there.
      If I'm not wrong, Monria's "Caverns" area also utilizes this "Indoor Mining Logic". But I'm not sure whether its ready to be visited (by players) yet or not...as I've never been there before.
Interesting Read:
Payback of Mining Activities Within Entropia Universe


Previous: Entropia Universe (Part Seven)Next: Entropia Universe (Part Nine)

Sunday, September 21, 2014

Entropia Universe (Part Seven)

Gameplay (Continued)
The Paying Activities
By "Paying Activities", naturally what I am referring to here are the kinds of stuff that you may do within the game that requires PEDs. And precisely because it requires PEDs...that what we're gonna be dealing with from now on is even that much trickier to handle. So be prepared.
  • Hunting
    Like hunting in regular MMORPGs, the hunting found within Entropia Universe isn't that much different to be honest. There's weapons for you to equip to hunt monsters with, armors to protect yourself with, faps to heal your HP as well as various sorts of attachments and upgrades for the aforesaid equipments.
    Entropia Universe - Thinking About ATH
    However, because it requires PEDs (or real money) to engage in hunting activities, you can't simply just slap on the biggest, hardest-hitting weapon that you can find, the toughest armor that you can afford, the highest healing fap that you can get and then head out thinking you can kill everything in your path, acquire loot and "profit" like mad.
    If your thinking about profiting from the game, please perish that thought. Afaik, breaking even from engaging in these paying activities is already hard enough as it is...let alone profiting from it.
    You will need to know all there is to know about these items. How they operate, their stats, the costs associated with using them, your proficiency with them, the efficiency at which your killing monsters and stuff like that. Else, you'll bleed PEDs like there's no tomorrow (and not knowing why it is so).
    • Weapons
      Within the game, there are a variety of different weapons that you can use for hunting purposes. But in general, they will inevitably fall into these three categories, "Range", "Melee" and "Mindforce".
      Entropia Universe - Range Melee Mindforce
      Ranged weapons are probably the most widely used kind...as they allow the player to immediately start attacking even from a distance away. It also allows you to "tag" monsters out one by one, thereby reducing your defensive costs as well as reduces your chances of being mobbed.

      Stuff like whips, axes, long swords, short swords and power fists form the bulk of your melee weapons. But because of the need to get up close and personal with the monster, their usage is less popular with the crowds.

      The only reasons for using them are to skill up and gain more HP, to increase your inventory weight limit as well as to purposely get hit and raise your "Evade" profession level (to prep your character for tougher, harder-hitting mobs).
      Usually, players will use a ranged weapon as a "tagger" to pre-damage the mob and then only switch to their melee once its close enough.
      For Mindforce, you can think of it as your "magic" in regular MMO terms. There's mindforce chips to deal fire, ice, electric and corrosive attacks. There's also chips that allows you to buff as well as heal up your avatar and those around you.

      However, due to a myriad of reasons...like availability of these chips, their markups (and hence their cost-effectiveness), their ability to deal sufficient damage hard or fast enough (at later stages of gameplay), their complexity to use as well as calculate the cost of using them or stuff like that, usage of these are mostly just down to the "rich/privileged" (those who can afford the rare or more useful chips) or people who simply don't care about cost-effectiveness and just wants to be different.
      To start using mindforce, players will need a mindforce chip, a mindforce implant as well as mindforce "ammunition" (like "Synthetic Mind Essence", "Light Mind Essence" and "Mind Essence").

      You will also need to acquire a Payn-Inc Implant Inserter from the Trade Terminal, attach (by dragging and dropping) the mindforce implant to this inserter, equip and activate it to insert the implant into your avatar's brain. (Using the inserter without attaching anything to it will result in the removal of any already inserted mindforce implant.)

      You can then equip and use any mindforce chips just as you would with a ranged weapon.
    • Weapon Stats Explained
      For the purpose of explaining this part, I will use the following picture as a reference example and from there, convey to you the various stats and their meanings as best I can.
      Entropia Universe - Weapon Stats Examples
      Condition-This bar tells you the condition of the item. At full condition (100%), this item is unused and "brand new". It is directly related to the item's TT Value stat.
      TT Value-Apart from relaying the current "TT Value" of the item, this stat also ties in directly to the condition of the item. At maxed TT Value, the item's condition bar will be full (at 100%).
      Condition Limit-This tells you the limit at which the item will break and become unusable. For instance, the Herman Ark-0 (L) will break once its TT Value reaches 0.09 PEDs (3% of max TT Value).
      Weight-This tells you the weight of the item.
      Item Points-This tells you how many item points it will occupy (towards the item limit). Note that this does not refer to the "size" of the item and how many "squares" (of space) it will take up in your inventory or storage areas.
      Tier-This tells you the "tier" of the item. The number before the decimal point (.) represents how many "tiers" you've unlocked for the item. For each tier unlocked, you may put in an "Enhancer" of the "appropriate tier" into the corresponding box (refer to Herman Ark-0 example).
      Entropia Universe - Tier Upgrade
      The number after the decimal point cycles from 0 to 9 through constant usage of the item. Once it reaches the value of 9, if its an unlimited item, you will need to manually unlock the tier via opening its "Tier Upgrade Interface" (right click on item) and putting in the necessary materials. If its a limited item, the tier will be automatically unlocked for free without you having to do anything.
      Profession Requirement (Damage/Hit)-This tells you the damage and hit professions that you need in order to use the item well (efficiently or to its "maximum potential"). The "Recommended Level" shown, however, is not a reflection of "WHEN" it is recommended for you to use the item in question, but rather indicates "WHEN" your character's corresponding professions will start to affect the item's stats.

      The Damage Profession will affect the item's damage interval stat (and perhaps Attacks per min) while the Hit Profession will affect the Hit Ability, Critical Hit Ability and perhaps Range.
      Skill Increase Bonus (SIB)-This tells you whether the item provides a skill increase bonus when you use them. "Not Yet" means that you've not yet reached the necessary profession levels (references to the item's "Recommended Level") for it to provide you a bonus. "Yes" means that it is currently providing the bonus. "Not Anymore" means that you've outgrown the weapon and it will no longer provide you with such a bonus. "Never" means that it will never offer you such a bonus.
      Ammo Type-This tells you the kind of ammo the item needs in order to function. You will need to have the stated types of ammunition (in your inventory) before you can use/fire the item.
      Ammo Burn-This tells you the quantity of the ammo that is consumed EVERY TIME you use/fire the item once.
      Durability-This tells you the durability rating of the item. Or rather, how much "decay" is incurred (to the item's TT Value) when you use/fire the item once. However, the rating only gives you a rough estimate. To obtain a more accurate value of the decay, you will either have to visit information sites such as "Entropedia" or resort to self-tests such as "Fruit Testing" or the like.
      Variable Weapon Stats (Attacks per Min, Damage Interval, Range)-These stats tells you the efficiency at which "YOU" currently operate the item at. It starts from a certain minimum value and will slowly increase to the maximum potential of the item (its max) as you gain levels in the appropriate professions.

      For items with SIB showing "Not Yet", this means that your corresponding professions are still below that of the "Recommended Level" of the item. In situations like these, you will be using the item at its minimum values (lowest efficiency level).

      For items with SIB showing "Yes", this means that your corresponding professions are in between the "Recommended Level" and "Recommended Level+5" range. In situations like these, you will be using the item at somewhere in between its minimum and maximum values.

      For items with SIB showing "Not Anymore", this means that your corresponding professions are at or above that of the "Recommended Level+5" range. In such situations, you can already use the item at its maximum potential ("maxed out" the item). Using "maxed out" items like these are very much advised...as you can operate them at its maximum values and hence obtain the best efficiency/value out of the item.

      For items with SIB showing "Never", you will be using the item at somewhere in between its minimum efficiency level and its maximum (just like in the "Yes" situation). However, these are typically known as your "Non-SIB" or "Old School" items and are stuff that you should always avoid using...because you will need your corresponding professions to be at or above LEVEL 100 in order to max out the item and use it at its maximum potential. (Unlike the SIB weapons which require only "Recommended Level+5" to max out.)
      Damage Type-This tells you what sort of damage (and the type) that the item deals. When up against NPC mobs, the type of damage being dealt is of insignificant consequence. However, once you are up against other players in PVP battles, it will start to matter because of the "armor" (and the kind of protection that it offers) that the player might be wearing.
      Hit Ability-This tells you your ability to hit stuff when using the item. The value shown here depends upon your current profession level for the stated "Hit Profession".

      Values here can range from "0.0" to the maximum of "10.0". At "0.0", your chances of hitting the target is at about 80%. At "10.0", your chances of hitting will increase to 90%.
      Critical Hit Ability-This tells you your ability to perform a critical hit when using the item. Just like for Hit Ability, the value shown here depends upon your current profession level for the stated "Hit Profession".

      Values here also range from "0.0" to the maximum of "10.0". At "0.0", your chances of doing a critical is almost non-existent (0%). At "10.0", your chances of doing a critical will increase to 2%. (By this, we mean that 2% of your attacks that "HIT" the target are criticals.)
      Tier Increase Rate-These here tells you the rate at which your tier values (the numbers "0" to "9" behind the decimal point) might "POSSIBLY" increase (at the various tiers). But none of this is certain.

      We can only speculate that the higher the numbers are, the "faster" the tier values might increase. But as there had been instances whereby an item with high tier numbers not even ticking up one bit after years of usage while some with low tier numbers ticking up twice within a mere couple of shots...that we suspect that there might be some hidden parameters and randomness at work here as well.
    • Costs of Using A Weapon (Range, Melee, Mindforce)
      The costs associated with using a ranged weapon is typically just the weapon's decay and its ammunition expense (on a per shot basis).

      Using the Herman Ark-0 (L) as an example, to calculate the cost of firing one shot of this ranged weapon, we will first need to know its actual decay value (per use), the amount of ammunition consumed (per use) and then add them altogether to find out the cost (per shot) of using it. (For convenience-sake, we shall consult Entropedia for the values.)
      Herman Ark-0 (L)
      Decay: 0.050 PEC
      Ammo Consumption: 240 BLP Pack or Universal Ammo
      Remembering that each BLP Pack is worth 0.01 PEC, we can easily calculate that the cost of firing one shot on the Herman Ark-0 (L) is 2.45 PECs or 0.0245 PEDs.

      The costs associated with using a melee weapon is typically just the weapon's decay. However, this decay is usually much higher than that of a ranged weapon's (of a similar damage capability)...so much so that it already includes the ammunition expense (of the ranged weapon) as a part of its cost, if you think about it carefully.

      Using the Bukin's Blade as an example, to find out the cost of using this melee weapon once, we will only need to know its actual decay value (per use). Again, visiting Entropedia for convenience-sake, this value turns out to be 1.70 PECs.

      The costs associated with using a mindforce chip is typically just the chip's decay and its ammunition expense (on a per shot basis). However, as it is further complicated by the fact that the mindforce implant "absorbs" a portion of the chip's decay, things actually become slightly more fuzzy and confusing to calculate in my opinion (with regards to finding out the "true" costs).
      Entropia Universe - Mindforce Example
      Using the First Gen Electric Attack Chip III and NeoPsion 20 Mindforce Implant as an example, the cost of using this setup is actually...
      First Gen Electric Attack Chip III
      Decay: 1.780 PEC
      Ammo Consumption: 712 Synthetic Mind Essence or Universal Ammo
      found to be 8.90 PECs or 0.089 PEDs.

      However, what you will need to know is that the 1.780 PEC of decay isn't borne solely upon the mindforce chip. 2% of that decay (as shown in the stats above) is absorbed by the NeoPsion 20 Mindforce Implant and will be deducted accordingly from its TT Value. The First Gen Electric Attack Chip III's TT Value will only be reduced by 98% of the decay indicated.

      If you were to use other kinds of mindforce implants (with higher absorption percentages), then the decay values sustained by both the chip and the implant will also change accordingly...so please take note of that.
      To this effect, if the markup of the mindforce chip is immensely more than that of the implant, you can actually serve to "save" some of the costs by having the implant absorb more of the decay (rather than not).

      But you will have to understand that this is only if your seeing things from the "markup" perspective. From the "TT Value" perspective, there isn't actually much of a difference since the "total decay" sustained is STILL THE SAME.
    • DPP, DPS And The Importance Of Being "Maxed Out"
      Damage per PEC (DPP) and Damage per second (DPS) are two very important values that you must learn to read (and understand), for a weapon. DPP tracks how much damage output your getting for every PEC that is spent while using/firing the weapon. DPS on the other hand tells you how much damage your pumping out per second.

      Together, they will give you an idea of how efficient you are...at using a weapon (if not maxed) or how good a weapon really is (once maxed). Without these values, there really isn't much of a leveled ground to compare weapons with.

      Anyway, to demonstrate what I've just said, let us attempt to find out my DPP and DPS on the Bukin's Blade in the previous example and when maxed. However, to avoid opening a can of worms...we shall conveniently use the "Weapon Compare" Calculator found on Entropedia and just key in the necessary info. (Do note that the calculator might not be entirely accurate...so take it with a pinch of salt.)
      Bukin's Blade
      Decay: 1.700 PEC
      Attacks per Min / max: 63 / 78
      Damage Interval / max: 3.2-6.5 / 3.5-7.0
      Hit Ability / max: 6.6 / 10.0
      Critical Hit Ability / max: 3.9 / 10.0
      By ticking the "HA/Damage Input" box and keying in the necessary info, what we get is the following.
      Entropia Universe - Bukin DPP DPS Example
      And as you can see, with my unmaxed stats on the Bukin's Blade, my DPP and DPS is only 2.528 dmg/pec and 4.90 dmg/sec. This means that if I had used the blade there and then without me being maxed on it, I can only at most dish out 4.90 damage a second...but at a cost of 2.528 damage for every PEC spent. (Do note that my actual "Attacks per minute" is 63 and not the 68.4 as shown in the calculator...hence the DPS is actually lower than that.)

      Had I been maxed on the blade, I would be doing damage at a much higher output per second (6.32 dmg/sec) and at a much better cost-effectiveness (2.862 dmg/pec) instead. And that is why it is very important that you use weapons and items in which you are "maxed out" on. (Barring the starter weapons of course...cause you have to start somewhere right?)
    • Hunting The Right Mob
      Now this is also another "touchy" topic because you can't simply just grab any gun or weapon and head out killing the first mob that you see. Likewise, neither can you just go out and hunt any mob simply by looking at the "L Number" of the mob.
      Why not?
      Cause there's a good chance that you might be out hunting on the wrong mob...be it in terms of weapon compatibility/match, in terms of your PED Card size (amount of PEDs that you have to hunt with) or perhaps some other reasons entirely.
      You should always research the mob first, its HP, what sort of damage and how much it deals. Then arm yourself appropriately.
      Entropia Universe - Mob Selection
      For instance, let us take a look at the above mobs. Which do you think a fresh off the boat recruit (to the game) can seriously kill without a hitch using their low damage starter weapons?
      Answer? None of the above.
      The Kerberos Old has 240 HP, the Nusul Young has 330 HP, the Argonaut Young has 300 HP and the Bristlehog Young, 280 HP. And the recruit on the other hand, may have only 88 HP (if I remember correctly).

      Even if the recruit were to have (hypothetically) used a maxed out Bukin's Blade on them, he or she would still require at least 50 attacks to slay the Kerberos Old, 68 attacks to kill the Nusul Young, 62 attacks on the Argonaut Young and 58 attacks for the Bristlehog Young.

      The weapon is simply not packing enough firepower (DPS) to kill the above monsters (takes far too long). And we aren't even talking about missing attacks, HP regen (of the mobs) and how much damage these buggers can deal.
      Its a classic case of a weapon mismatch. Wrong choice of weapon on the wrong mob.
      However with that being said, one should also be mindful and not use a weapon that's too powerful for the mob. Why? For reasons of "overkill".

      Imagine you using a weapon that costs 20 PECs to fire a shot and deals on average 58 damage. If you use it to kill a 20 HP mob, don't you think that your overdoing it a tad bit? Surely you don't expect that the system would actually pay you back for the "lost damage" right?

      Finally, not only should one choose the right weapon for the job, one will also need to hunt monsters (with the right amount of HP) according to one's PED Card size.

      Due to the way the system works, the loot that you might get from killing a mob, isn't quite "fixed". It may be a "No Looter" (does not pay you anything), a "Fragment Looter" (remember those blazar and nova fragments worth 0.001 PECs each?), a "Bad Looter" (pays you back some loot, but not enough to cover your cost to kill) or a "Good Looter" (pays you back your cost to kill or perhaps even more...way more).

      Nonetheless though, although it may be random, but if you kill a "SUFFICIENTLY" large quantity of the mob and over a "SUFFICIENTLY" long period of time (consider "rationing" your PEDs to possibly "avoid" dry spells), you should reasonably expect to get back about 90% of your PED expenditure (it takes money to make and maintain the game too you know).

      That is if you are doing things efficiently. And by efficiently, it means that your not grossly spending more than the mob might loot..."On Average".
      So how do you know what's the right mob for your PED Card size?
      Well...a good rule of thumb is that ON AVERAGE, the system appears to pay back about 3 PECs (TT Value) worth of loot for every 10 HP that the mob has. (Might be more depending on how tough the monster is, its HP regen and damage capabilities.)

      And ON AVERAGE, it takes you slightly more than that to kill...maybe about 3.4 PECs for every 10 HP that the mob may have. (Might be more depending on your actual DPP and perhaps other unforeseen expenditures like armor or fap costs.)

      From then onwards, its just a matter of how many of the mob you will need to kill to get to this "expected outcome". And this...I can't really tell you for certain. Some say that you will need to kill hundreds, some say thousands and others...tens of thousands.
      The actual numbers needed? I'll leave that for you to decide.
      However, one thing that is for certain is that...as you progress within the game and start to hunt higher HP and tougher mobs, the amount of PEDs (or real money) that you will start to lose will also increase accordingly. (10% of 100 PEDs may be a small sum to lose...but what about 10% of 1000 PEDs, 10k PEDs or even 100k PEDs?)

      Hence, in my humble opinion, you should ought to tailor yourself and hunt mobs according to how much your willing to lose (as entertainment) for playing a game (on say...a monthly basis).
    • Weapon Attachments
      Entropia Universe - Amp Scope Sight
      The above are typical examples of your "Amps", "Scopes" and "Sights" found in Entropia Universe.

      For Amps, there are BLP Amps, Energy Amps and Melee Amps. These are mostly attachments which you put onto a weapon to boost its damage capabilities (open inventory, drag and drop amp onto weapon). However, there's a catch to its usage.

      The Amps should only be placed upon weapons with a maximum damage of at least TWICE that of the amp. For instance, the Omegaton A105 does 16 damage (13 Burn, 3 Penetration). Hence, it should only be placed on a weapon with a 32 or above "maximum damage" (refer to item's damage interval).

      The reason being that if its below that value, then the amp will not be able to function at 100% efficiency...and yet will still consume the same amount of "decay" as well as additional ammo which may be needed by the amp (check its "Ammo Burn").

      Hence, you will have "lost damage" in this case as well...and incur a penalty to your DPP output.
      Another function of Amps is to "raise or improve" the DPP output of your weapon. However, this effect will have to depend upon the individual amp's DPP as well as the "Markup" at which you've obtained it.

      Additionally, the closer the weapon's maximum damage is to the amp's requirements, the heavier the amp's DPP effect will be upon the weapon's. So you will have to take note of this as well.
      For Scopes and Sights, the benefits of using them are fuzzy...as the game developers have refused to tell us anything.

      But from what tests and experiments that have been performed by the players, it appears that they are mostly used to improve your "hit ability". But only for weapons that are not "maxed" and also usable only upon ranged weapons.

      For "maxed out" weapons, these do not seem to have any effect at all. Attaching these will not allow you to improve your "hit ability" beyond the 90% that is already being offered to maxed weapons.
      Do note that although useful, it is still not recommended (in my opinion) to use unmaxed weapons even if you use these scopes and sights to boost your "hit ability".

      Firstly, you are actually spending additional "decay" (of the scopes and sights) in order to improve your "aim".

      Secondly, the benefit of being able to hit better only has a slight effect on improving your DPP using an unmaxed weapon (but might possibly just be cancelled out by the "extra" decay). The bulk of being able to use the weapon to its maximum DPP potential actually lies upon getting the "Damage Interval" (of the weapon) maxed.
      Useful Reads:
      Entropia Universe - Hit Ratio 2012
      Entropia Universe - Hit Ratio Conclusions
    • Armors
      Now armors are, quite frankly, not my forte...because, to me, they are simply just something that adds to unnecessary, additional expense on my cost to kill a mob. I'll usually try to avoid using them unless and until it becomes impossible to hunt a mob without wearing one. But nonetheless, I'll try to explain what I had grasped from reading up about it.
      Entropia Universe - Armor
      Within the game, there are two kinds of armors that you can use, Limited and Unlimited. While both serves the same purpose, they somewhat function on slightly different sets of rules.

      Firstly, without me having to say it again, you ought to know by now that limited armors cannot be repaired while unlimited armors can. Hence, you can use unlimited armors to your heart's content while limited ones have to be discarded and replaced upon them breaking down to their condition limits.

      Secondly, while limited armors offer their full protection values regardless of the TT conditions they are in, unlimited armors don't...and will have their protection values reduced as their TT Values whittle (refer to armor above). You will need to repair unlimited armors regularly (and maintain them at close to their full TT Values) in order for them to operate at their maximum protection capabilities.
      Because of this, unlimited armors with higher maximum TT Values are slightly more desirable than those which have low maximum TT Values...as they have more TT Value to burn before their protection starts to decrease.

      However, that would also mean that you will end up having more PEDs which are trapped (within the armor) and unusable.
      Armors are then also divided into seven unique parts, Helmet/Face Guard, Arm Guards, Harness, Gloves, Thigh Guards, Shin Guards and Foot Guards.

      Each of them functions as a separate "entity" and their protection values do not stack together when considering damage reduction. It will all have to depend upon which part (of the armor) the mob actually hits.

      If the mob hits your head, its your helmet/face guard that will protect you (and decay accordingly). If it hits your body, then its your harness that will protect you...and so on and so forth.
      As far as I know, certain monsters also have the "tendency" of hitting certain parts. For instance, tiny monsters which can't reach anywhere above your legs will mostly end up hitting your shin or foot guards more often.
      With respect to damage reduction, from what I've read, it appears to be a simple subtractive approach.

      If the mob does 30 damage (10 Impact, 10 Cut, 10 Stab) on you and your armor (the one protecting you from that hit) offers 20 Impact, 5 Cut and 0 Stab protection, then the 10 Impact damage will be negated. The 10 Cut damage will be reduced to 5 while the Stab damage will totally pass through...resulting in the mob dealing 15 damage on your character.

      Decay-wise, I do believe that the more damage the armor absorbs, the more the decay that is incurred upon the armor's TT Value.

      Minimum Decay (in PECs) = Sum of Protection Points (on armor) / 100

      However, there also appears to be a minimum decay value being enforced. So long as even 1 damage is being absorbed by the armor will result in the minimum decay being applied.

      Hence, you will need to match your armor very carefully and according to the mob that you will be hunting...or risk getting a very "fat" decay bill at the end of the hunt.
      Never use armors with high protection values on monsters that hit very low damage.

      And be especially aware of mobs that deal "exotic" damages in which your armor might have some protection against, but are of very low protection values.
    • Armor Platings
      Entropia Universe - Armor Plating
      These armor platings are kind of like "attachments" which you can freely add onto or detach from armors. They help provide additional protection in situations whereby your armor simply cannot cope with the damage of a monster.

      Used correctly, they will not only enable you to survive, but may also help "save" your decay bill...as they can be more economical than using just armor (of similar protection values) alone. However, if used in the wrong situations, they will oftentimes cause you to be overprotected and will increase your expenditure instead.

      Damage reduction-wise, they function pretty much just like armors. They will also be exposed to the full damage of the mob and decay accordingly. It is only when counting the actual damage on your character, that is when the damage absorbed by both the armor and armor plating gets added together and deducted from the full damage calculations.

      Useful Read:
      Entropia Universe - Armor Decay

    • Medical Faps
      Entropia Universe - Medical Faps
      Medical Faps are tools which you will often need to use when out hunting...due to the "very slow" natural regen of the character. (Unless your willing to wait until your HP recovers, in between monster kills, to save costs.)

      Usage of these are pretty similar to when your using weapons. Just equip and use them. Their TT Values will decay accordingly, on a "per use" basis as well.

      Additionally, the regular rules also applies. One should always strive to use "maxed out" faps and avoid using "Non-SIB" ones. Likewise, you should also check and calculate the fap's "heal output", "heal/sec" and "heal/pec" when choosing a suitable fap for use.

      The "heal output" and "heal/sec" will help you determine whether it can be used within combat or strictly in non-combat situations. The "heal/pec", on the other hand, will help you decide whether it is economical to use the fap...or should you just chuck it aside and choose another one instead.

      Useful Link:
      Entropia Universe - Medical Faps


Previous: Entropia Universe (Part Six)Next: Entropia Universe (Part Eight)

Thursday, September 11, 2014

Entropia Universe (Part Six)

Gameplay
The next couple of sections may perhaps be the toughest part of this game that I'll be attempting to explain.

Because it deals with inherent gameplay mechanics, looting as well as the expenditure of PEDs ("real money"), the game developers have been reluctant to reveal much about the way things work. Everything about it or even remotely close to it has been wrapped in secrecy...so much so that most of what I will be bringing across to you will be based upon player-gathered info and perhaps hearsay as well.

As such, things may not be totally accurate or correct...be it due to vital info being withheld by players in the know, unannounced tweaks made by the game developers to the coding, lack of skills or access to the items in question (not everyone can afford everything within the game), too many unknown variables and/or the lack of control during experiments, shortage of data samples or PEDs for that matter.

All I can say is that it will be to the best of my knowledge nonetheless...

The Free Activities
By "Free Activities", what I am referring to here are the kinds of stuff that you may do within the game that does not require the spending of PEDs and yet may help you to earn some.
  • Sweating
    Entropia Universe - Sweating
    In this form of activity, what the player does is to equip a special kind of tool called the "VSE Mk 1" (can be found in your Inventory, under the "Tools" tab), aim at mobs which are "sweat-able" (mostly animal-type mobs but may include other types as well depending on the planet) and click to activate the sweating process. You might need to click a couple of times before the process kicks in.
    To avoid killing your mouse buttons, it might be a good idea to hotkey the "Toggle Auto-Use Tool" icon found in your Action Library and use that to activate your VSE Mk 1.
    After starting the process, you will have to maintain your aim at the mob for a couple of seconds before finally acquiring something called the "Vibrant Sweat" (typically between 1 to 4 bottles) like as shown above. However, if at any time during this process, you were to get hit or lose your aim upon the mob...the process will be disrupted and you will have to start all over again.

    What you will have to note though is that each mob will only give as much Vibrant Sweat as its total amount of HP. If a mob has 10 HP, it will only give 10 Vibrant Sweat. If it has 1000 HP, it will produce up to 1000 Vibrant Sweat before becoming "dry" (and can no longer be sweated). After getting this, the only thing left to do is to kill the mob (and loot it) or turret it and then go grab another to sweat.
    One good way is to get together into groups and sweat one huge mob (easier to aim at) with high HP, slow attack speed, low accuracy and bearable damage. As most mobs can only attack one player at a time, this will allow minimal disruption to the sweaters while maximizing the amount of Vibrant Sweat collected per hour (typically about 400 to 500 bottles may be collected per hour in such a group).
    Entropia Universe - Selling Vibrant SweatEntropia Universe - Selling Vibrant Sweat 1
    Upon collecting enough bottles of these, you may then sell them to other players who might be needing them, for a certain amount of PEDs. These Vibrant Sweat can be refined together with Force Nexus (an Enmatter) to form Mind Essence (fuel/ammo to power Teleport Chips). It is also used by crafters as ingredients to craft certain items such as welding wire, furniture or components of weapons, armors and miscellaneous tools or clothings.
  • Walking
    Entropia Universe - Stuff To Look For Walking
    In this form of activity, what the player does is to merely walk (press Q to toggle Run/Walk) around all over the place looking for "hidden" objects like "Fruits", "Natural Stones" and "Common Dung" (such as those shown above).

    These objects are almost impossible to find when you run because they have a certain visibility range of about 4 to 5 "walking steps". Once you move beyond this range, the objects will turn invisible and will no longer be seen.

    As such, it is typically a good idea to look for these by first limiting your "search area"...to places with definable "ends", such as shorelines or Land Area borders.

    You should then consider doing a "systematic sweep" of the area via perhaps walking from North to South in a straight line (until you've reach the designated end of the area), take 10 side steps and then continue walking, but this time from South to North.
    By doing something like this, you can increase your chances of finding them considerably...as compared to just merely walking around aimlessly.
    However, one should note that when employing such a tactic, it is advisable that you pick a place where there are preferably no mobs...so that there won't be any to hinder or obstruct your walking path.

    Also, do consider walking upon terrains with a singular, consistent and light color/texture such as snow or sand. This is partly to reduce the strain upon your eyes as much as possible and also to increase your ability to see the objects when they do pop up.

    You may also wish to tone down your graphic settings to remove needless vegetation (from being rendered) so as to reduce the amount of distraction.
    On average, it takes about an hour or so to find two of these stacks to pick up (if your lucky...maybe three).

    Very time consuming in my opinion and hardly worth the effort considering that your character will gain no skills doing such an activity. Not to mention that what you may find (and its amount) is random.

    If you find natural stones, then good for you...as their markups are decent. If you find fruits and dung...then not so good as their markups are pretty bad in contrast to the stones.
    Entropia Universe - Fruits Stone Dung Uses
    As for the usage of these objects? Well...afaik, fruits are mostly refined together with Sweetstuff (an Enmatter) to form Nutrio Bar (a sort of food for feeding hungry, tamed pets). However, as taming had been removed ever since the implementation of CryEngine 2 and has yet to be reintroduced back into the game, Nutrio Bars are currently...OF NO USE.
    Certain fruits however, like Bombardo and Papplon, are also used in the manufacturing of some components or paint cans. But as their uses are somewhat limited...demand for them are also low as well.
    Natural Stones are used in the crafting of textures while Common Dung is refined together with Growth Molecules (also an Enmatter) to form Energized Fertilizer (something that's needed by Land Area owners to ensure that the mobs found on their lands...mature and flourish).
  • Oil Rig/Field
    When engaging in this form of activity, what the player does is to actually stick around within a certain area, waiting for barrels of Crude Oil (worth 0.01 PED each) to appear. The catch, however, is that you WILL have to "compete" (or gang up together) with others for these crude oil...as the place is PVP-enabled (but not PVP-lootable).
    Entropia Universe - Contaminated Zone
    PVP-lootable zones are "Contaminated" areas (marked in red on your map once you've visited it once) whereby players found within can be killed and relieved of all their hunting and mining stackables (looted), if they have any within their inventory at that point in time.

    However, entrance to these zones require a kind of "Anti-Toxic Shot" purchasable from the Trade Terminals. Without such a shot, a player will be unable to enter these zones as they will instantly die due to "toxic radiation" (but we all know its just to prevent ignorant newcomers from accidentally stumbling into such an area, not knowing its consequences).

    Typically, people would want to enter these zones because of the special monsters (to hunt) or mining claims (to find) that can only be found within these zones. And because of them being limited to within these areas, plus the risks involved (of being pked), the markup of the stuff found within are pretty high and commands a decent price.
    These oil rigs or fields can typically be categorized into, loosely, three types. "Tiny", "Small" and "Big". They may be found on the various planets within the world of Entropia Universe...depending on whether the devs or planet partners decides to implement one.
    Entropia Universe - Logan Peak Oil Field LocationEntropia Universe - Logan Peak Oil Field
    A classic example of a tiny oil rig is the one found on Planet Rocktropia's Hunt The Thing.

    In such an oil rig, barrels of crude oil are spawned all over a "specific" area...but in stacks of 1 to 2 barrels (so each stack is only worth 0.01 to 0.02 PEDs). These barrels are invisible until you get within a certain range of them and thus will require you to "run all over the area" in order to pick them up.

    But because each "stack" of crude oil takes about 15 to 20 seconds to "spawn" and the area can only hold about roughly 20 stacks of them concurrently, it is estimated that you may get only up to 2.00 PEDs of crude oil per hour at best...if your alone and no one else is vying with you for them.

    But its precisely because of such measly "payout", that hardly much PVP action is seen there and there's a sporting chance for you to actually be able to pick up some barrels of crude oil...if your patient and fast enough (in clicking and spotting them).
    Entropia Universe - Orthos Oil Rig LocationEntropia Universe - Orthos Oil Rig
    An example of a small oil rig is the one found on Planet Calypso's Orthos Oil Field.

    In such an oil rig, barrels of crude oil are spawned within a "specific" area close to the "oil rig" structure (in red in middle of picture above). It is spawned in stacks of about 50 barrels of crude oil each (or 0.50 PEDs). However, only one such stack may exist at any point in time, I believe.

    But as it has a fairly fast spawn rate...of a few minutes per stack, it is estimated that you may get about 10 PEDs worth of crude oil per hour. Fairly lucrative don't you think?

    Usually, if the oil rig is "open", you will get to see players lining up in a line, each waiting for their own turns to get a pick of the oil. However, at times, "greedy" players may come and wreck this line or even close the rig down via "overwhelming firepower"...just so that they can hog the oil for themselves.

    In such instances, one may only blame it upon "just their luck"...especially if it was close to their turn after having waited for some time. Else, they may also choose to fight back against the aggressors...but its usually pointless as it will merely boil down to being a "war of attrition"...of the PEDs.
    Whomever can force the other side to "lose" more PEDs than its worth their time at the oil rig wins.
    As such, you will typically start to see one or both sides trying to wear each other's armor down with flamethrowers...or going naked, armed with only their "uber faps" (some powerful cost-effective healing tool) and forcing the other side to "waste" ammo.
    Entropia Universe - Ashi Oil Rig Location
    An example of a big oil rig is the one found on Planet Calypso's Ashi Oil Rig.

    In such an oil rig, barrels of crude oil are also spawned within a "specific" area close to some "oil rig" structure much like the one seen in Orthos. However, instead of only spawning in stacks of about 50 barrels of crude oil, this one is much more major and spawns in stacks of about 500 barrels each...or 5.00 PEDs worth (but also only one stack at a time, I believe).

    Likewise, it also has a fairly fast spawn rate...and thus is estimated to be churning out roughly 100 PEDs worth of crude oil per hour.

    Sadly though, because of such high outputs of pure TT Value...this oil rig is almost certainly camped 24/7 by the "big boys". So don't expect to get close enough or even catch a glimpse of the crude oil spawning...unless you are "one of them".
These are not the be-all and end-all though. There may be other opportunities out there if you can think creatively and outside the box. However, the ones mentioned here are the easiest to get into without much knowledge about the game and/or "Investment PEDs". Except for perhaps the oil rig...


Previous: Entropia Universe (Part Five)Next: Entropia Universe (Part Seven)

Friday, September 5, 2014

Entropia Universe (Part Five)

Value In Your Hands
Now the reason why I'm talking about this first before even touching on the gameplay is because...you'll need to be able to discern the value of something. Else, how the heck are you even gonna be able to conduct trades with others once you start playing the game?

This is especially so since the game deals with real money and you wouldn't want to shortchange yourself now would you?

Anyway, to learn about the value of something, one will need to know about the "Currency" used in Entropia Universe, about "Trade Terminal Value" (TT Value) and about "Markup".

PEDs, PECs and What???
First, let's talk about the currency and its denominations...

Within the game, there's generally two forms of currency that players would regularly use for trades. The "Project Entropia Dollar" (PED) and the "Project Entropia Cents" (PEC).
Entropia Universe - Currency
As you can see above, the difference between the two of them is merely just their visual colors (one's golden while the other's silverish). However, their "TT Values" are vastly different (one's 1.00 PED while the other's 0.01 PED).

And since you already know that 1 USD is equal to 10 PEDs, and 0.10 USD is equal to 1 PED, I doubt I'll need to tell you which one's of more value right? But I've digressed...so let's head back on topic.
Entropia Universe - PED Card
Next, we have the "PED Card"...our virtual wallet within this game. This card is always found within the first tab of our inventory and is used to materialize PEDs and PECs from within our account, a mere number, into a physical, solid form that we can use for trades.
Entropia Universe - Extraction Window
To do so, all we need to do is right click on the PED card and select the "Extract PED/PEC" option. You will then be shown a tiny window with some "Up" and "Down" arrows. From there onwards, its just a matter of selecting the right amount to extract and your done.

Either use the arrows to choose the amount you wish to extract or use your numpad to type in the amount. Do note, however, that values before the "decimal point" will be extracted in the form of PEDs while values after will be extracted in the form of PECs.

Entropia Universe - A Hundred PECsEntropia Universe - Dropping 100 PECs into PED Card
After materialization, the PEDs and PECs can be handled in just the same way as "stackables". You can split them, merge them or drag and drop them into the PED card to dematerialize it back into a numerical value in your account.

But that is as far as it goes...

Although 1 PED holds the same value as 100 PECs, it cannot be broken down into PECs directly as it is (without going through the PED card). Likewise, merging PECs into a stack of 100 PECs WILL NOT change it into 1 PED. They are fundamentally just like a regular "stackable item". An orange cannot simply change into an apple regardless of how many oranges you stack together, now can it?

Now that you know what PEDs and PECs are, let's take it up a notch and talk about denominations that are EVEN SMALLER than a PEC.

Your Kidding Right?

Hell no. I'm serious...

Entropia Universe - AmmunitionEntropia Universe - Sweat Fruit Fragment Stone
Individually, the TT Values of these items may appear to look 0.00 PEDs, but if you stack enough of them together, you will eventually start to see that they are actually worth something.
  • The 0.01 PECkers
    Things that fall into this category are typically your ammunition of all kinds. Explosive Projectiles, Weapon Cells, BLP Packs and Synthetic Mind Essence.
    Stacking 100 of these together will show up to be worth 1 PEC of TT Value. Hence individually, they are calculated to be worth 0.01 PEC each.
  • The 0.001 PECkers
    Things that fall into this category are Vibrant Sweat, Fruits (Bombardo, Caroot, Haimoros, Papplon), Fragments (Blazar, Nova) and Natural Stones (Brukite, Nissit, Kaldon, Rutol, Sopur, Trutun). There may be others out there, but these are the general ones that you will often encounter across the planets.
    Stacking 1000 of these together will show up to be worth 1 PEC of TT Value. Hence individually, they are calculated to be worth 0.001 PEC each.

Markup
Building upon your previous concepts of PEDs and PECs, of TT Values, 0.01 PECs and 0.001 PECs, let's go into something even more mathematical. Markup.
Entropia Universe - Markup
Within this game, there are two forms of "Markup" that you will encounter. And the easiest place with which you will find them is actually at the "Auctioneer" (like as shown above).
  • The TT+Markup
    With the "TT+Markup", what we're actually doing is to sell something for a total sum of its "Trade Terminal Value" (of the item) PLUS the "Markup" (we're charging).

    For instance, if I have something with a TT Value of 0.01 PEDs and I say that I'm selling it for "TT+1.99", this means that if you as a player wants to buy that item from me, you will have to pay me a total of 2.00 PEDs (0.01+1.99).
    This form of markup calling is usually meant for "Non-stackables" (items that are singular and cannot be stacked together) as well as "Unlimited" items. However, with the advent of "Calypso Land Deeds", certain forms of stackables (esp. deeds) are now also found to be using this version of marking up.
  • The Markup As A Percentage
    For "Markup As A Percentage", what we're doing is to sell something at a percentage of the item's TT Value.

    For instance, if I have something with a TT Value of 0.01 PEDs and I say that I'm selling it for "200%", this means that if you as a player wants to buy that item from me, you will have to pay me a total of 0.02 PEDs (0.01x200%).
    This form of markup calling is usually meant for "Stackables" (items that can be stacked together) as well as "Limited" items.


An Item's Value
Okay...so you've just learnt about PEDs and PECs, about TT Value and about Markup...but this still doesn't tell you one bit about the value of an item now does it? How will you know what is the value of an item that your holding?

Well hold your horses...we'll be getting into that right now.
Entropia Universe - Bukin's Blade Market ValueEntropia Universe - Herman ARK-0 (L) Market Value
Typically, if you right click on an item...any item so long as its auctionable (able to be put up on auction via the auctioneer), you should ought to see an option called "Market Value".

For items which aren't and do not have this option, you will just have to rely upon yourself, other players and/or infer its market value from other similar stat items or products which may require this item as a part of its ingredients.

Upon opening it, you will see a small window with the item's average daily, weekly, monthly, yearly and decade info for sales and markup.

And if you click on the tiny buttons found beside the "Sales" column, you will bring out their respective markup history graphs.

Now that's all fine and dandy, but how do I read it?

Usually, if your just the typical gamer who doesn't want to rack his/her brains on the issue, just looking at the info in the small window will be sufficient.
  • Period
    Tells you which period the data samples were taken and calculated from. ("Day" means for that day, "Week" is for the past week, "Month" is for the past month and so on and so forth.)
  • Markup
    Tells you the AVERAGED markup of the item (for that period).
  • Sales
    Tells you the quantity of the item sold for that period if its a non-stackable or unlimited item. Else, it will tell you the Total (Sum) TT Value of the item sold for that period.
  • Tier
    Usually available only for items that can be "tiered", this option allows you to check the markup histories between the different tiers of that item (from Tier 0 to Tier 10).
However, if your the brainy or cautious type, or if the sales and/or markup is suspiciously weird to you, then its recommended that you look into the details just to be on the safe side.

Yes...its not unheard of for devious people to attempt to "manipulate" the information provided by this "Market Value" option...so as to misguide others about the "actual value" of an item. However, this is typically only performed upon items that are non-stackable and in low available quantities (since its often easier to manipulate the prices of such an item).

A word of caution. Performance of such a deed is "frowned upon" by the game developers as well as the game's community. And it is still unknown (at least to me) as to whether actions will be dealt upon the perpetrators of such a deed.

But sometimes though, the sudden fluctuation in markup of an item might be valid and due to changes in circumstances (perhaps some VU changes, periodic event cycles or something like that). Hence, the best cause of action is still to check the markup history graphs and decide for yourself.

Anyway, to understand how to read the graph, let us take a look at the following example.
Entropia Universe - Markup Graph Reading
In this example, you can see that I've just managed to sell an item called "Chikara Oni-Roku E.L.M Edition (L)". It is a "limited" (cannot be repaired) weapon that has a maximum TT Value of 1.00 PED (if full and unused).

And from this, what you should take away is that in the period of "that day", a POSSIBLE total of 6 "Chikara Oni-Roku E.L.M Edition (L)" had been sold (each one is 1.00 PED if full TT and the sales was 6.00 PED).

Next, from the "Item Sold" confirmation, you can see how the sold item has an effect on the markup history graph for that day...how the lines are drawn, where the markups are, the sales as well as when it was sold.

You can use your mouse to hover over any point in the graph and it will show you the corresponding values of the various axes within its tooltip. These values do not reflect the actual sales, markup or time values but the AXES' values (for easier reading). Adjust your mouse position accordingly (depending on which point you wish to inspect).

* Disclaimer: From this point forth, the rest is just my understanding of how to read the graph. It may or may not be totally accurate. Use your own judgement on this. *

And so from my understanding, according to this "Day" graph, if you exclude the point made by my sales, then a total of 5 other pieces of this weapon was sold within the day.

Two pieces were sold at close to the "2013-09-13 18:03:46" mark at an averaged value of below 1400% markup. Their markups were lumped together and averaged possibly due to their sales time, time when sold, being very close to one another. This can be deduced by the evident sharp point marked by the "Sales" line (in cyan) at the 2.00 PED mark.

The other three pieces could possibly be hiding within the straight line section of the graph...with one sold at the start and end of the line and the last one hiding in between....and thus forming the straight line seen.

That is my understanding of how the Day Market Value graph can be read. As for the Week, Month, Year and Decade ones? It should possibly be working in the same way with each data points making a sharp visible "point" within the graph.

However, these data points should be seen as averages for that specific time period...pending on how the system handles the individual auction sales. But nonetheless, it should be sufficient for you to now gauge and understand the value of what you have in your hands now, right?
Just be sure to note that this "Market Value" data is a compilation of all the sales that happened for that item regardless of which planet it was sold upon. Hence, the data will not reflect the minute discrepancies in markups on the various planets found in existence within the game. (Usually items sold on the "production" planet, native/local/whatever, will mostly be "cheaper" than when sold on other planets that do not produce them.)
Previous: Entropia Universe (Part Four)Next: Entropia Universe (Part Six)