

 Sunday, May 26, 2013
5:02 AM
Sunday, May 26, 2013
5:02 AM
 BuLaDiFu
Ground System & Combat
To introduce to you Star Trek Online's ground system and combat, I should probably first start off with some of the basics which you can also pick up and learn if you follow the in-game tutorials.
Movement, Mode and Interaction

Movement of your character in STO is not that much different from other games that you've played. By default, "W" moves your character forward, "A" moves your character to the left, "S" moves your character backwards and "D" moves it to the right.
Next, there are two modes of play in STO that you must get acquainted with, "RPG" mode and "Shooter" mode (press "B" to switch between the two modes). In "RPG" mode, the player would have the freedom to move his or her mouse to point and click at stuff shown on the screen while in "Shooter" mode, moving of the mouse would simply turn the character to look around and change where your viewing. Naturally, I doubt I would have to remind you of which mode is useful in which sort of situations. However, I must warn you of this annoying bug that seems to keep popping out whenever your playing in "Shooter" mode.
Apparently, whenever you interact with stuff in the game while being in "Shooter" mode, there will be times when it is necessary for you to "regain" control of your mouse cursor to click at things. When this happens, the system will automatically switch you to "RPG" mode temporarily until the interaction is over. However, during the switch back to "Shooter" mode (after the interaction), if you unfortunately pressed any of the movement keys ("WASD") while the switching is taking place, your character will be stuck in perpetual movement along the direction of the pressed key.
The only way to "free" yourself from this perpetual movement is to switch back to "RPG" mode and hit the same key again. And though it may not sound like much at this point in time for you, I can tell you that this annoying bug has certainly popped up at the most inopportune times for me especially during combat. So you have been warned...

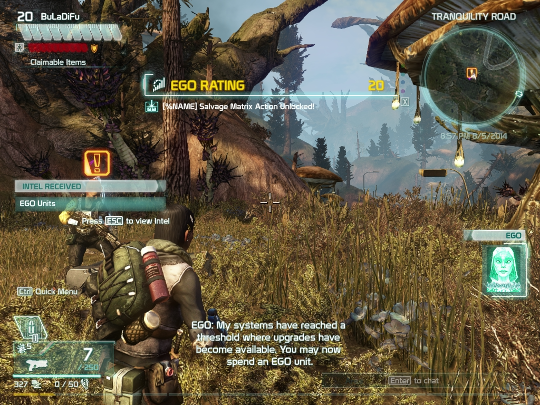
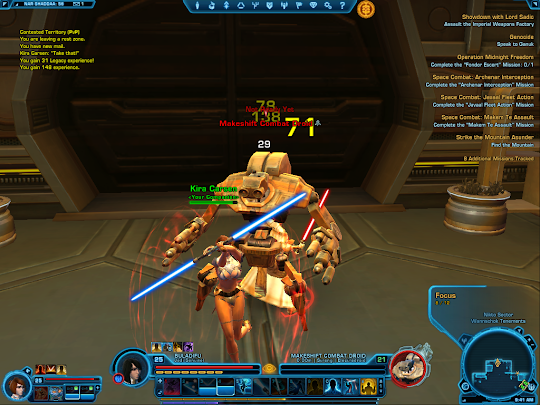
While these two are the more commonly used modes of play, there is a third mode called the "Aim" mode which I seldom use due to its movement penalty but would nonetheless still be useful for you to know. You can switch to this "Aim" mode by pressing "X" on the keyboard. And upon doing so, you should start to see a huge circular reticle like as shown in the picture above.
During this mode, all of your ranged attacks would gain a damage bonus (+33%). However, like I've mentioned earlier, you will also incur a movement penalty as well. I would normally only use this mode if I'm at the back of a group and someone else is doing the tanking.
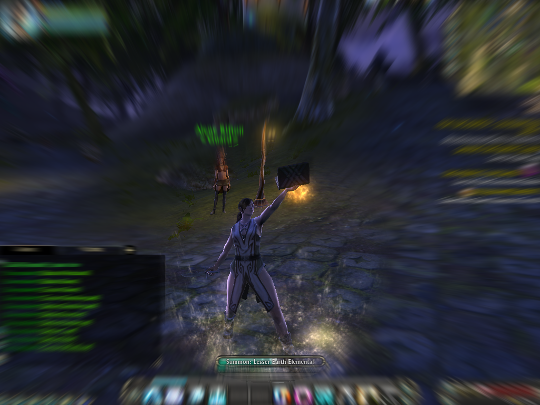
As for interacting with stuff in STO, you would mostly just need to note that if they are NPCs, they will likely have some sort of icon found on top of their heads. If the item in question is an object, then it will be brightly lit up and flashing (like shown above). Anyway, all you have to do in either case is to move close to the NPC or object and then click to select (in "RPG" mode) or press "F" (if in "Shooter" mode) once the interaction window appears. If there is more than one option, while in "Shooter" mode, you may use the arrow keys to cycle through them before pressing "F" to confirm.
Combat

Although fighting on the ground in STO is pretty simple and straightforward, there are still quite a few things that you will need to know before you are set and battle-ready.
To introduce to you Star Trek Online's ground system and combat, I should probably first start off with some of the basics which you can also pick up and learn if you follow the in-game tutorials.
Movement, Mode and Interaction

 |  |
Apparently, whenever you interact with stuff in the game while being in "Shooter" mode, there will be times when it is necessary for you to "regain" control of your mouse cursor to click at things. When this happens, the system will automatically switch you to "RPG" mode temporarily until the interaction is over. However, during the switch back to "Shooter" mode (after the interaction), if you unfortunately pressed any of the movement keys ("WASD") while the switching is taking place, your character will be stuck in perpetual movement along the direction of the pressed key.
The only way to "free" yourself from this perpetual movement is to switch back to "RPG" mode and hit the same key again. And though it may not sound like much at this point in time for you, I can tell you that this annoying bug has certainly popped up at the most inopportune times for me especially during combat. So you have been warned...

During this mode, all of your ranged attacks would gain a damage bonus (+33%). However, like I've mentioned earlier, you will also incur a movement penalty as well. I would normally only use this mode if I'm at the back of a group and someone else is doing the tanking.
 |  |
Combat

- Hotkey Bar
The hotkey bar is, by default, located on the bottom-center of your ground combat view screen. Starting from the leftmost, the first box shows you the two weapons that you have equipped on your character. You can switch between the two equipped weapons by either using the button found on the left side of the box or by pressing "Z" on your keyboard.
The next row of boxes are naturally meant for your skills and consumables of course, however, not all of them are "free" for you to assign at will. Hotkey slots 1, 2 and 3 are forcibly occupied by your weapon actions and cannot be altered. The sort of weapon actions that you get will be dependent upon the weapon itself and changes when you switch weapons. But other than that, the general concept behind these attacks should stay the same.
Slot 1 is a normal weapon attack, slot 2 is your alternate firing mode (usually an "Expose" or "Exploit" attack) and slot 3 is kindda like your knockdown or pushback attack (it usually serves to create room or moving space when your surrounded and will be a close range melee attack). And in "Shooter" mode, these weapon attacks correspond to the left mouse button, right mouse button and middle mouse button respectively.
As for the last two small buttons found on the rightmost end, clicking on the top one would bring out a list of ground skills that you have and can use. This list of skills come from a combination of your career, currently equipped kit and devices (consumables). You can left or right click and drag them into appropriate slots on your hotkey bar for use. If you wish to shift these skills around once they're on your hotkey bar, you will have to use right click and drag instead as left clicking would simply activate them.
Clicking on the bottom one would call out a row of numbers (1, 2, 3). Each number represents a different preset view of the hotkey bar and upon clicking would show additional rows of hotkey slots up to a maximum of 3. Skills placed on these additional rows can be accessed easily via pressing a combination of "Alt" or "Control" plus the appropriate number (also shown as A1, A2, A3, ..., C1, C2, C3, etc at the top left corner of the slots).
- Issuing Commands to Your Away Team
You can basically think of your "Away Team" as a bunch of AI helpers that helps you fight in ground combat when your all alone and not in a team with others. The team can be made up of customizable bridge officers that you've recruited or non-customizable default-spec security officers (if you don't have enough bridge officers). And since they are AI-controlled, you can mostly just ignore them during the fights as they should ought to handle themselves adequately. However, there are still simple basic orders that you will need to learn so as to improve your overall combat efficiency as a team or perhaps just to prevent the occasional foolish one from suiciding when they charge right into a swarm of enemies.
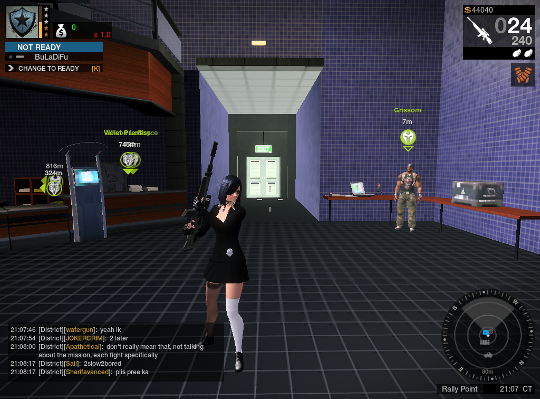
Anyway, on the left hand side of your ground combat view screen (right beneath your portrait), you should see a row of buttons. These buttons are meant for you to issue orders to all of the AI-controlled NPCs in your "away team". Starting from the left again, the first button orders all of your crew to enter a passive mode. While being in this mode, your AI crew do not attack enemies at all and will only concentrate on performing heals and buffs. Clicking on the second button returns all of your crew to normal mode where they would perform attacks, heals and buffs at will again.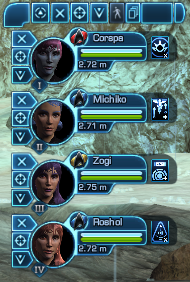
The third button orders your crew to focus on your current target. If it is an enemy, all of your crew will start to swarm and engage the enemy. If it is an ally, then your crew will assist the ally instead. The fourth button allows you to setup a rally point where all of your AI crew will gather and attack the enemy from. Right clicking on the button will remove the rally point. However, do use this rally point button sparingly as it would crowd your crew together and while useful for heals and AOE buffs, a single grenade thrown in your direction would hit everyone.
The fifth button is the team leave button. It is only active when you are in a team with another player. Clicking on this button would allow you to leave the team. The sixth and final button works in a similar fashion to the one on your hotkey bar. Clicking on it would just alter the look of your team panel.
Next, the three buttons right beside each of the individual portraits of your away team allows you to issue the same type of commands but to that specific crew member instead. The top one is a toggle button that orders the person to switch between normal and passive mode. The middle button orders him or her to attack/assist your current target while the bottom one would command him or her to stay put at a specific point that you've set up.
And on the other side, right after the HP and shield bars, there should be some rectangular skill icons. These icons represent the skills and abilities of your bridge officers. Left clicking on them would order the person to use or activate the skill. Alternatively, you may also right click and drag them onto your hotkey bar for easy access during combat.
Lastly, this little button found on the right hand side of your ground combat screen is the "almighty" pause timer. It allows you to freeze all activity within your current combat zone for the duration shown. Normally, I would just ignore the existence of this little button, but sometimes when you do get into nasty situations, you can activate this timer to buy yourself precious time to coordinate the attacks of all members on your team.
Upon activating it, all time in the zone will freeze and the timer will start to count down until you unfreeze it. If you don't, the timer will eventually reach zero and all motion will resume regardless. And apparently, to prevent abuse or overuse, the timer will only regenerate itself if you leave it alone (up to its maximum of 45 seconds).
- Ground Equipments and Devices
The following shows your character's equipment and status window. You can bring it out by pressing "U" on the keyboard.
As you can see, your character is able to equip stuff in five general categories, body, devices, kit, shields and weapons.
And without going too much into the details, the body slot can be equipped with various kinds of body armor. These body armor mostly serves to reduce incoming damage sustained upon your HP via increasing your damage resistance. However, there are some variants that improves your damage capability at the expense of offering less protection.

The devices slots are meant for putting in consumables and non-consumables that would be useful to you during a ground battle. These may include food (recovers HP outside of combat), hypos (recovers HP during combat), power cells (boosts damage) and shield charges (recovers your shield points). What you need to note here is that the items themselves cannot be used directly from your inventory. They must be placed in these slots before they can be hotkeyed for easy access.
Kits are separated into three distinct categories, Tactical, Engineering and Science. Each kit, when equipped, will grant your character access to different special skills for use during ground combat (up to a maximum of four). And though these skills may range from heals, force fields, stasis fields, holographic soldiers, turrets, buffs to debuffs, they are grouped together according to the purpose of the kit as well as their category. A close combat kit will not have skills that boost your ranged abilities and neither will you find shield recharge (an engineering skill) in a kit from the science category. Furthermore, you are only allowed to equip kits from the same category as your character's chosen career. So a Tactical officer can only equip tactical kits while an Engineering officer may only use engineering kits.

As for the shields slot, they allow you to equip some sort of personal shield that protects your character from harm. Any sort of damage sustained would have to get through the shields first and only after it falls will your HP be next. However, do note that there are some types of weapons (melee) that can deal partial or near full damage directly upon your HP, effectively bypassing the shields.
For the weapons part, despite there being all sorts of weapons to use, what you will need to know here can generally be summarized into these few points.

- Weapon Type
The weapon type would determine the kind of attacks that the weapon will do. An assault minigun would shoot out 4 beams quickly with its normal attack and 11 short beams in a narrow cone with its alternate fire. A pulsewave assault would shoot out some sort of energy ball with its normal attack and an expanding wave in a large cone radius with its alternate fire.
- Damage Type
The damage type would determine the kind of damage that the weapon will do as well as its speciality bonus. A Phaser assault minigun would deal phaser damage while a Disruptor assault minigun would deal disruptor damage despite both doing the same amount of potential damage. The speciality bonus of a phaser-type weapon would be a 2.5% chance to stun and reduce runspeed while a disruptor-type weapon's would be a 2.5% chance to reduce all damage resistance by 10 for 10 seconds.
- Weapon Rank
For the same type of weapon, the damage capability of the weapon would scale according to its weapon rank. The weapon's rank is represented as "Mk" followed by a roman numeral. The bigger the numeral, the higher its weapon rank and therefore the better its damage capability. However, with the weapon rank also comes level restrictions, so you will need to be at certain levels before you can use the higher ranked weapons.
- Weapon Range
Although weapon range isn't a visible stat that is shown in a weapon's description, it is still good to know that different weapons have different weapon range. For example, a pistol has clearly a shorter range than a rifle. And if you attempt to fire a weapon at beyond its weapon range, none of the shots will deal any damage upon the enemy so be sure to take note of it.
Finally, one last thing to know about ground equipments is the existence of rarity and modifiers. The rarity of an item may range from Common, Uncommon, Rare, Very Rare to Ultra Rare while the kinds of modifiers available would depend upon the type of the item in question.

But anyway, as far as this is concerned, the rarity would improve the base specs of an item as well as the number of modifiers that it will come with (Uncommon: 1 modifier, Rare: 2 modifiers, Very Rare: 3 modifiers, Ultra Rare: 4 modifiers).
The modifiers, on the other hand, would provide the item with some kind of bonus specs or effects like increased critic chance, increased critic damage, increased damage, increased knockback chance, improved resistance to certain damage type, increased capacity or improved regeneration.
For more information, you may visit Star Trek Online Wiki - Personal Equipment.
- Weapon Type
- Expose, Exploit, Crouching and Flanking
"Expose" and "Exploit" are two terms that you will often come across when fighting in STO ground combats. They are mostly found appended to various sorts of attacks. For example, in the previous pictures found above, the Uncommon ground weapon has one of its attacks flagged as an "Exploit" attack while the Ultra Rare ground weapon has its labelled as an "Expose" attack.
Basically, an "Expose" attack has a chance to make their target or targets become exposed and vulnerable. And during this period of vulnerability, any sort of "Exploit" attack performed upon the exposed target would be very effective and deal extra damage...or so I've heard.
But from what I've experienced so far, most skirmishes are pretty quick and messy so there's hardly time for you to see which of the targets are exposed to use your exploit attacks upon. Most of the time, your already very busy and preoccupied with attacking, moving around avoiding fire and using whichever skills that have cooled down anyway...though I've read from the Star Trek Online Wiki that you can apparently press "G", by default, to target enemies that are flagged as exposed so perhaps that might make things easier, who knows?
The last two ground combat mechanics that you ought to know about would be crouching and flanking.
First of all, let me talk about crouching. Whenever you wish to make your character crouch, you can do so by pressing "C" on the keyboard. And what happens after your character crouches is that you will gain a +50% dodge bonus which is pretty useful when your up against enemies that are shooting at you from a distance.

However, what you will also need to know about crouching is that besides this dodge bonus, whenever you crouch you will also be penalized with a -100 damage resistance against melee or in other words, vulnerable to physical damage. So while being handy against ranged shooters, you wouldn't want to be still crouching when an enemy is close enough and in striking distance.
As for the thing about flanking, whenever possible, you should try to attack an enemy from the sides or from behind. This is because the ground combat system is programmed in such a way that all attacks incurred from the sides or from behind will gain an additional bonus in damage.
The exact amount of bonus that you gain is unknown, but what I do know is that all flanking attacks will be shown with a "Flank" followed by the damage dealt so it is pretty obvious to see if your flanking someone successfully or not. And in the same way that it is desirable to flank your enemies, it is very undesirable to allow yourself to be flanked. You should always strive to not show an enemy your back as its the fastest way to meet your maker.


| Previous: Star Trek Online (Part Two) | Next: Star Trek Online (Part Four) |
 Posted in: Star Trek Online


