Monday, September 24, 2012

Phantasy Star Online 2 (Part Five)

Mag
Phantasy Star Online 2 - Mag
A Mag is an artificial life-form that is found in the world of Phantasy Star Online 2. It is kind of like a pet in regular MMOs and likewise, you will need to feed them constantly or they will starve and not provide any support like healing or attacking.

Basically, to obtain your first Mag, you will need to be at least level 5. Once you satisfy this requirement, look for Koffee at the quest counter to pick up the Mag License Client Order. Complete the client order and you will be awarded with your first Mag. But do note that each player is only allowed to have one Mag and any extra Mags will require Arks Cash.
Phantasy Star Online 2 - Infant Mag
When you first obtain your Mag, it will be in its infancy stage. And depending on what items you feed it with at this stage, it will evolve into different types of Mags.
Phantasy Star Online 2 - Mag Raira
Raira
Phantasy Star Online 2 - Mag Fornaxs
Fornaxs
Phantasy Star Online 2 - Mag Repus
Repus
Phantasy Star Online 2 - Mag Antria
Antria
  • Raira - High Level in Striking Support (打撃支援)
  • Fornaxs - High Level in Range Support (射撃支援)
  • Repus - High Level in Tech Support (法撃支援)
  • Antria - High Level in Ability Support (技量支援)
So for example, if you wish to have a Raira, all you need to do is to feed your Mag with items that increases the level of its Striking Support. Continually do so until your Mag reaches level 30 and it will evolve into a Raira.

Your Mag is sort of like a trash can and will eat just about anything from weapons to armors to consumable items as well as photon art disks. However, all these items will affect your Mag's stats differently so it would be wise not to just randomly feed it.
Phantasy Star Online 2 - Feeding Your Mag
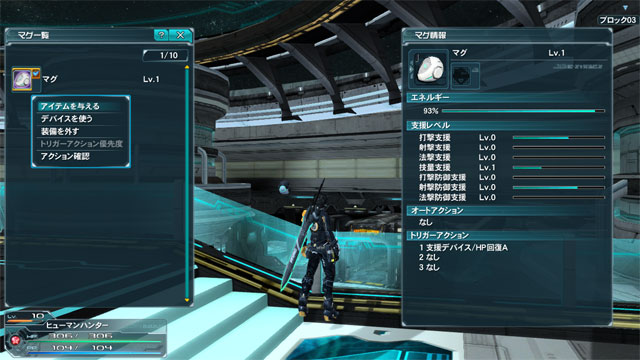
To feed your Mag, all you need to do is press "F4" to access your Mag's information window. From there, select the Mag and then click on the first option. You will then see a list of items that is currently available in your inventory that could be fed to your Mag.

Next, hover your mouse over the potential item you wish to feed your Mag with. The corresponding effect of feeding that item to your Mag will be reflected on your Mag's stats window. If a blue bar is shown in any of your Mag's stats, this means that eating the item will result in a decrease of that particular stat. Alternatively, if an orange bar is shown, it will mean that eating the item will result in an increase of that stat. Usually, I will try to gather as many items as possible while running through an instance and then pick an item that does not decrease any of my Mag's stats to feed it with.


The bar shown with a percentage is actually the Mag's energy bar. When you feed it with items, the bar will increase. But at any time, you can only feed it with a certain amount of items and once this bar gets close to 100%, you will need to wait for a few minutes for it to drop down before you can feed your Mag again. If it ever drops to 0%, your Mag will cease to provide any form of support until you feed it.

And if you take a look closer at your Mag's stats, you will notice that your Mag's level is actually the sum of all the levels of your Mag's stats. If you decrease any of the stats, your Mag's level will decrease. Likewise, if you increase any of them, your Mag's level will increase. And as far as I know, there are currently two stages of evolution for a Mag, once at level 30 and then at level 100.
Phantasy Star Online 2 - Photon Blast
The most prominent feature of a Mag is perhaps its ability to perform a unique attack called Photon Blast. Your Mag will gain this ability once it evolves for the first time at level 30.
Phantasy Star Online 2 - Photon Blast Ready
To use the photon blast attack of your Mag, you will first need to assign the skill to your hotkey bar. After doing so, just run around the instances and fight monsters as per normal. When the attack is charged up and ready for you to use, the circular icon beside your HP bar will start to glow. At this point in time, you can then press the corresponding key for the skill to activate the photon blast (in my case its "2"). However, I usually keep the photon blast for emergency usage or boss monsters only.

For more information regarding Mags, please refer to:
PSO2 Open Beta: Intro to Mags

Item Shopping via Visiphone
Phantasy Star Online 2 - Visiphone and StoragePhantasy Star Online 2 - Item Shopping
The last thing that I think you would need to learn in order to handle yourself well within PSO2 would be how to shop for items sold by other players.
  • First of all, find a Visiphone (the purple "?" icon as shown in the picture on the left).
  • Next, press "E" to interact with it and then select the first options you see in the lists your shown with until you reach the window as shown in the picture on the right.
This is the item search window where you can select the parameters of the items you wish to find from the sea of items sold by other players. And since I don't understand Japanese, I usually just use the first drop-down and filter by item category. Do play with the other filters as well if you wish, but I suppose they're meant for fine-tuning your search.
Phantasy Star Online 2 - Weapons Search
In this above example, I did a weapons search and the system retrieved a list of weapons sold by the other players. As you can see in the picture, there is a wide variety of weapons that are being sold and the list is sorted by selling price.

In this list, there are a couple of weapons which are lit up while the others are greyed out. Those lit up weapons are actually usable by my character while those greyed out ones are either not suitable for my profession or I still do not satisfy the requirements to equip them.

The top-most button in this window is the refresh button. Usually I would click on it if I find that the item I wanted to buy seems to have disappeared. This usually happens when someone else have already bought the item and your list is no longer up to date.
Phantasy Star Online 2 - Weapons Buying
Once an item catches your eye, click on it to enter the player's shop and look for the corresponding item. From then on, just purchase the item as you would when buying and selling at the NPC vendors. After successfully buying the item, it will appear in your inventory and you can then equip it as per normal.

With that, I have told you all that I've learnt about Phantasy Star Online 2. I wish you success and hope you will have fun in this game.


Previous: PSO 2 (Part Four)

Friday, September 14, 2012

Phantasy Star Online 2 (Part Four)


Job Class
Phantasy Star Online 2 - Job Class ChangerPhantasy Star Online 2 - Job Classes
One particular thing about job classes in Phantasy Star Online 2 is that it is not fixed. At any point in time, you can approach the above shown NPC to switch classes. However, each of these classes have their own levels, so you might need to re-level from scratch unless you've previously played and leveled with them. So if you like switching around job classes, this literally means that the number of "characters" you have to level just tripled (maybe more because I heard that some other job classes will be implemented in September 2012).

Weapons & Armor
Phantasy Star Online 2 - Assault Rifle
Each of the different classes have their own set of weapons which they can equip. In general, a Hunter (Melee) can equip most if not all of the melee weapons, like sword, wired lance, partizan and gunslash. A Ranger (Ranged) can equip gunslash, assault rifle and launcher while a Force (Magician) can use rod and talis.
Phantasy Star Online 2 - Rear Arm Leg Units
Armor-wise, there appears to be four categories available, namely, rear units, arm units, leg units and sub units. However, there are only three slots available on a character for you to equip these units (rear, arm and leg). Basically, rear units can only be equipped on the rear slot, arm units on the arm slot and leg units on the leg slot. As for sub units, these can be equipped on any of the three slots if I'm not wrong.
Phantasy Star Online 2 - Launcher StatsPhantasy Star Online 2 - Sub Unit Stats
But do note that apart from being in the right class, the weapons and armors do also have particular stat requirements to fulfill before you can use them. For example, the launcher has a prerequisite of 259 ranged attack power (base) and I have a ranged attack power of 273 (unarmed) hence I can use it. The sub unit shown in the picture requires 67 (Dex) and I have 230.

These requirements sort of acts like level restrictions so that you can only use them once you reach a certain level else you will practically be able to steamroll over the monsters by just acquiring high level equipments.

As an additional note, there are no stat points to allocate in PSO2. Every time your character gains a level (in the job class), you will automatically receive an increase in your character attributes (like HP, PP and Attack Power) according to the characteristics of the job class. Furthermore, these character attributes will change depending on which job class your in and your level in the job class.

Photon Arts & Techniques
Phantasy Star Online 2 - Photon ArtsPhantasy Star Online 2 - Rodeo Drive
To aid players in killing the monsters, each of the weapon types in PSO2 actually comes with a set of skills that can be learned. The above pictures show some of the photon arts which I've picked up for launchers and a demonstration of one of them (Rodeo Drive).

For each of these photon arts and techniques, there exists a total of ten levels of proficiency. Each level of proficiency is capable of dealing better damage than the previous. But to learn these skills, one must acquire the corresponding level of photon art disk for that skill or technique. In other words, if you wish to pick up level 10 Rodeo Drive, you will need to find the level 10 photon art disk for Rodeo Drive.

These photon art disks can be found either by hunting around in the instances (drops from the monsters) or bought from other players (via the Visiphone). And as far as I know, only premium members are allowed to sell and trade stuff via the Visiphone. Free to play members can only sell stuff to the NPCs but could still buy stuff from other players.
Phantasy Star Online 2 - Weapon Palette
To use the photon art or technique, one must first bring out the weapon palette. This can be done by pressing the "F5" key. As you can see in the above screenshot, I have 6 "setup slots" available on my weapon palette (of which 3 are already used). When you've first started, you will only have 3 until you've done the weapon palette expansion quest.

Anyway, if you take a look at any one slot, clicking on the first box (leftmost), you will be able to select the type of weapon you wish to equip for this setup slot. Upon selecting the desired weapon, the next few boxes will appear (with one filled and the others empty). The filled box is actually your "default" or standard attack for the weapon while the other 3 boxes is where you would place the various photon arts that you've learnt for that weapon.


During instances, pressing "R" or using your mouse wheel will allow you to rotate between the different setups. And while using any particular setup, left clicking will make your character perform a standard attack while right clicking will perform the photon art that's designated in the third box. If you left or right click while holding the shift button, you will use the photon arts placed in the fourth and fifth boxes respectively.

For melee weapons, on the other hand, things would work a little differently (refer to my setup slot 1 in the picture). When using the gunslash, continuous left clicking would perform an attack cycle starting from a standard attack to the photon arts in the third, fourth and fifth boxes and then back to the standard attack. The shift button then becomes a toggle to change the gunslash between sword and gun form. When using the other melee weapons, I believe the shift button acts like a block function to guard against attacks.

* Since there are only three slots available for photon arts, I would normally choose the highest damage ones or those that work well together (as combos). *

Skill Tree
Phantasy Star Online 2 - Ranger Skill Tree
Every time you level up in your job class, you will gain one skill point (for the job class). This skill point can be used to learn some skills which would boost your overall efficiency in that job class. Some of these skills are passives and offers some bonus to your character attributes while some are actives that can be used upon enemies or self during instances.

* This skill tree can be accessed by approaching the same NPC that does your job class change. *

Phantasy Star Online 2 - Hotkey Bar
To use the active skills learnt in this skill tree, you will first need to assign it to your hotkey bar (which can be accessed by pressing "F7"). Just click on any of the boxes in the first hotkey bar and a window will pop up. This window will consist of two tabs where one is for items in your inventory and the other is for skills (active skills learnt from skill tree or mag skills). You should then select the appropriate skill to place in the box and then you will be able to use it by pressing the corresponding key while within instances.

As a final note, you ought to be informed that some of these active skills only works with certain weapons though. For example, the weakness bullet skill (shown in the picture) only becomes usable when I am using my assault rifle. Upon using the skill, my next shot is loaded with a special bullet that reveals the enemy's weak spots for a small duration (only when it hits). And if I hit the enemy's weak spots within this duration, the damage inflicted will be massive.

Useful links:
PSO2 Spreadsheet
PSO2 Skill Simulator

Previous: PSO 2 (Part Three)Next: PSO 2 (Part Five)

Thursday, September 6, 2012

Phantasy Star Online 2 (Part Three)

Gameplay
The gameplay of Phantasy Star Online 2 (PSO2) actually works pretty much like Metal Assault, Crimecraft and Divine Souls. They all work based on having a central hub for player to player interactions and then from there create instances where people can solo or team together for adventures.
Phantasy Star Online 2 - First AreaPhantasy Star Online 2 - Second Area
Essentially, the hub consists of two areas only. The first area houses NPCs which provide services to creating of instance dungeons, client orders (quests) and skills trainer. The second area kind of acts like a shopping area. It houses NPCs which sells basic equipment and items as well as upgrading services.
Phantasy Star Online 2 - Instance Counter
To create an instance, you will first need to locate the reception-like counter as shown in the picture above. The NPC on the left handles the instance creations while the NPC on the right (apparently called Koffee or something) gives some particular quests such as expansion of weapon palettes, obtaining your first "Mag" (somewhat like a helpful pet in regular MMOs) and also the opening of new instances for exploration (like forest, cave and desert).
Phantasy Star Online 2 - Instance Manager
Anyway, after you approach the NPC on the left (press "E" to interact with the NPC), three options will appear. The first option allows you to create new instances. The second one allows you to join existing instances created by other players. The third option let's you exit the conversation.
Phantasy Star Online 2 - Instance Type
Assuming you've opted to create your own instance, you will be further shown a couple more selections. And from what I can guess, the first one allows you to create a free exploration type of instance where you run around and explore the area until you reach the end with a final boss to defeat. If you can complete this particular type of instance under a certain time limit, you will open up a new instance to explore (as mentioned earlier but only if you undertook the respective quest from Koffee).


The second option allows you to create mission type instances whereby you run around the instance to complete a particular objective. Upon completion of the objective, the instance will end (but you can still opt to roam around though).

The last option was not previously available to me actually. I think it only appeared after I recently completed a particular "leg" of the storyline. Therefore, I'm guessing the type of instance created using this option would probably be somehow related to the story mode.
Phantasy Star Online 2 - Emergency InstancePhantasy Star Online 2 - Emergency Notice
Once in a while (several times a day for an hour each), however, there will be an extra option that appears with an exclamation mark appended to it. This is actually an event type of instance generated by the server under the scenario that the "Ark" is under attack. The tell-tale sign of this event is that you will hear a server-wide broadcast of the invasion. At the same time, all video and graphic billboards on board the Ark will immediately switch to show the word "Emergency".
Phantasy Star Online 2 - Instance SelectionPhantasy Star Online 2 - Instance Entrance
Upon creating an instance, you should head for the "doorway" to the instance as shown in the picture above. Stepping through this doorway will immediately transfer your character to the "prep zone" (a small area where you can prepare your character for the instance or wait for other players to join your instance).
Phantasy Star Online 2 - Prep Zone
In this prep zone, there's a couple of terminals. The ones shown in the picture above is for item selling and buying (left terminal) and storage (right terminal). The items you can buy from this terminal is limited to mostly healing and trap tool items (consumables).

There's three more terminals that aren't shown in the picture though, but one functions as an "instance changer" that allows you to change to other instances. Another sort of functions as a healing/boost terminal or something. I'm guessing that the options in this terminal sort of sells you temporary "boosts" (HP, PP, etc) for the instance your about to do. The final terminal allows you to "recruit" NPCs or other friends in your friend list to tag along with you for the instance. However, these recruited allies will be controlled by the system AI and will not actually be alive.
Phantasy Star Online 2 - Instance Screenshot 1Phantasy Star Online 2 - Instance Screenshot 2
Anyway, after all preparations are complete, just proceed to jump down the portal and you will be sent to the start of the instance.


Previous: PSO 2 (Part Two)Next: PSO 2 (Part Four)

Saturday, September 1, 2012

Phantasy Star Online 2 (Part Two)


Character Creation
I believe that one of the unique features of playing Japanese-made MMOs is the effort they've put into the details in making a character. The tons of options that a player has in customizing their in-game character is amazing and leaves us "spoilt" for choice literally. (Now if only The Secret World had this sort of intensive character creation ability and it would have been perfect.)

Human

Phantasy Star Online 2 - Human FemalePhantasy Star Online 2 - Human Male
Elf
Phantasy Star Online 2 - Elf FemalePhantasy Star Online 2 - Elf Male
Robot
Phantasy Star Online 2 - Robot FemalePhantasy Star Online 2 - Robot Male
Anyway, back to PSO2, the game allows us to choose between three types of races. I believe one of them looks human, the second race looks sort of like elves and finally the last race seems to be robots. And regardless of the race, options are made available for the player to choose either gender (which is fantastic in my opinion).

Phantasy Star Online 2 - Job Selection
After choosing your character's race, the next option that comes along is to choose your job class. From the three options available in this stage, I can deduce that the sword-welding character (first option) should be the melee class, while the gun-welding character (second option) should be a ranged class. The last option shows a character holding what appears to be a staff, so I'm guessing this final class ought to be the mage or healer class.

Phantasy Star Online 2 - Character Templates
The third stage of character creation shows you a variety of character "templates". During this stage, all you need to do is to select the "template" that best fits the ideal character you have in mind. And don't worry, for this isn't the finalized version of your character. You will be doing massive tweaks around in stage four.

Phantasy Star Online 2 - Facial Tweaks
Now this is the part where it gets slightly complicated. There is a massive number of options for you to click and each of those options lets you adjust a particular part of your character for example, facial features, hairstyle, hair colour, eye colour, height and build.

To illustrate how extensive it is, let us take for example the eyes.

Phantasy Star Online 2 - Eye Version 1Phantasy Star Online 2 - Eye Version 2
Phantasy Star Online 2 - Eye Version 3Phantasy Star Online 2 - Eye Version 4
The adjustments you can do for your character's eyes isn't only limited to a dozen or so "versions" to choose, but rather a wide range in the form of a "two dimensional slider grid". By moving the dot to various positions in the grid, you will see that your character's eyes will gradually change and adjust itself.

Phantasy Star Online 2 - Facial Fine TuningPhantasy Star Online 2 - Hairstyles
To further individualize our characters, we are even given the opportunity to adjust the proportions of the face and the relative locations of the eyes, nose, mouth and ears. And don't forget the usual hairstyle and clothing accessories that you can pick for your character too.

All in all, you ought to have more fun fiddling around with all these available adjustments instead of rushing through character creation. I'm pretty sure you will find the "ideal" avatar to represent yourself in the world of Phantasy Star Online 2 if you look hard enough. But just be sure not to press the reset option which is close to the bottom of the selection window or all your hard efforts might be in vain.


Previous: PSO 2 (Part One)Next: PSO 2 (Part Three)