Tuesday, August 21, 2012

Phantasy Star Online 2 (Part One)


Phantasy Star Online 2
Today, I am going to introduce to you a recently released MMO called Phantasy Star Online 2. Somehow, by some sheer coincidence, I've managed to pick up and play this free MMORPG that's made by SEGA. I kind of like the environment and gameplay thus far and so I've decided to feature it in my blog.

However, I would like to offer a word of caution before we proceed. This free MMO is in Japanese and there isn't an English version as yet. Nonetheless, the game is still available to the world-wide audience (I believe) and not restricted to only Japan IP. And I believe, if you like playing games, a little trouble like language barrier shouldn't deter you from playing anything right? All it takes is some fooling around and web surfing to familiarize yourself with the critical game options and your set.

Phantasy Star Online 2 - Website
To aid you in your adventure, I'll at least guide you along with where to register and where to download the client.
  • Client Download
    If you click on the purple coloured icon labelled "1", this will take you to the client download page. Just download the downloader.exe and run it. It will automatically retrieve the client onto your computer. I believe the file size of the client is around 3.26 GB or something.

    It has an auto-resume function, but since it is in Japanese, it might take some fiddling around to resume. So if you need to download it a little at a time, I would suggest that you mess around with the available options right at the start. Doing it at the start would prevent you from accidentally selecting the wrong options and "delete" or "over-write" what you've previously downloaded.

    For your information, the fully patched client folder is around 5.51 GB at the time of this post, so I believe that it will take some time for you to patch up to speed from the existing downloaded client installer. Additionally, the "progress bar" shown when your patching the client isn't really detailed in the sense that it makes you feel that it is not progressing at all, but it is. As a safety precaution, however, you can just regularly check the file size of your client folder to make sure that it is "increasing" in size. If it isn't, then please check to ensure that your not "blocking" the patcher with your firewall and the like.
  • Account Registration
    If you click on the bluish icon labelled "2", this will take you to the account registration page. Personally, I have used Google translate on this webpage to register for my account, but if you like to save yourself that trouble, you can refer to this website, Phantasy Star Online 2: Registration Guide, for detailed instructions on how to create your account (it even comes with screenshots to illustrate the steps).

Ships & Blocks

Phantasy Star Online 2 - ServersPhantasy Star Online 2 - Channels
Much like Dragonica and Maplestory, the game world of Phantasy Star Online 2 is split into different ships (servers) and blocks (channels). A character made in one ship will stay on that ship and cannot be found when you log in to another ship. However, one can freely change from one crowded block to a less crowded one just like changing channels in Maplestory.

And from what I've read so far in the forums, most of the English-speaking players currently reside on Ships 2 and 10, although there are some minority found on Ships 4, 6, 8 and 9.
Apart from knowing which Ship they are at, you should also note which block they often hang in when they're online. For example, the English-speaking players on Ship 6 normally hangs around in block 30.

In the next few articles, I will go into more details regarding the game mechanics and whatnot of Phantasy Star Online 2, so do stay tune. But in the meantime, you can go ahead and try out the game instead of waiting (if your already interested in it).

If your still worried about the language problem, please head towards this blog, Phantasy Star Fan Blog. It has an excellent coverage of the translations of all the quests and game options to help you get started.

Next: PSO 2 (Part Two)

Wednesday, August 15, 2012

Dead Frontier (Part Three)


Inner City
Dead Frontier - Inner City Interface
The above picture shows the interface that players see when within the Inner City. It basically uses the top-down view approach and does not offer any other camera angles.

Health
The player's health is shown at the top left-hand corner of the interface and has the shape of a heart. Although it does not show the actual percentage of your health left, the indicator does roughly tell you how close you are to dying. Just like in real life where you can only guess how bad your wounds are.

IndicatorIndicator ValuePenalty
Healthy75% - 100%None
Injured50% - 74%None
Serious25% - 49%None
Critical1% - 24%All Stats are halved (Bloody Avatar)
Dead0%Death

You can regain health by leveling up (restores to 100% health) or by using medications like plasters, antiseptic sprays and bandages.

Dead Frontier - Death
But if unfortunately you die, you will lose all cash on hands (half for levels 6 - 10). Cash that you've deposited into your bank will not be affected. Alternatively, one can get a Security Box which can guarantee saving a portion of the cash. These boxes can be found in the Inner City or bought from the marketplace (off other players' hands).

Apart from losing cash on hands, players who have died will also lose 50% of the experience points gained since leaving an outpost. So to avoid losing too much experience points, it would be wise to visit an outpost on a regular basis just to "lock in" those precious experience points you've earned.

Lastly, upon dying, players will have to wait a certain amount of time before they can revive (typically for non-privileged players it is 2 minutes). Players will be re-spawned in the last outpost they have visited, regardless of which outpost they are closest to. For levels 1 - 10, players will revive with 40% health while higher leveled players will revive with 20% health.

Nourishment
Right beside your health, there's a fork and spoon icon. This indicator shows you how well-fed your character is. While staying logged in, your nourishment level will gradually drop. If your currently at an outpost, your nourishment level will drop by 1% every 30 minutes. But if you are wandering through the Inner City, your nourishment level will drop by 1% every two minutes instead. You can regain nourishment only by eating food like Candy, Baked Beans and Tinned Tuna.

IndicatorIndicator ValueEffect
Nourished75% - 100%125% EXP
Fine50% - 74%100% EXP
Hungry25% - 49%75% EXP
Starving0% - 24%50% EXP
(Once at 0%, 1% Health is lost
every hour while logged in.)

Armor Durability
If your character is wearing an armour, a third indicator will be shown on the interface (right beside the nourishment indicator). This indicator shows you how badly damaged your armour is. You can only regain a damaged armour's durability by asking an engineer to repair it.

IndicatorIndicator ValuePenalty
Normal75% - 100%None
Scratched40% - 74%None
Damaged1% - 39%None
Broken0%Once at 0%, the armor won't absorb
damage anymore and 100% of received
damage will go to the character's health.

Energy
This small indicator works sort of like your "stamina" bar. It will start to drop when you hold your "left shift" key to make your character sprint. Once you stop sprinting, it will start to regenerate back to 100%.

Keys & Controls

Dead Frontier - Main Menu
When you press the "Esc" key while within the Inner City, you will call up the main menu. The only times when you need to call up this menu is when you either have to change some settings or re-read the instructions cause you've forgotten something.

Dead Frontier - Settings
Apart from the regular settings like graphics detail, brightness and sound volume, there is one other important option that can only be accessed from the settings menu - the "Single Player Mode". When this mode is checked, your character will log in to an alternate Inner City. In this Inner City, only your character and zombies exist while all other players will not be found. You can think of it like a solo instance or dungeon found in other MMOs.

Dead Frontier - Controls
The instructions menu basically shows you the critical shortcut keys that you will need to memorize while being in the Inner City. While most of the keys are self-explained, I might need to bring your attention to one particular key - "F2" (Instance Following).

This key allows you to "instance follow" a particular person. All you need to do is press the key and type in the ID of the character you wish to follow. From then onwards, whenever you and that character move towards the end of a map area, the server will ensure that both of you will end up being in the same instance on the next map area.

Entering Buildings

Dead Frontier - Entering Buildings
Other than running around the Inner City, players also get to enter various kinds of buildings that are lying around. These buildings can range from trailers to small apartment buildings to even warehouses. The existence of these buildings which can be entered are two-fold actually.

First of all, they provide an additional dimension to the landscape. Players looking for more excitement or loot can choose to enter the tight and close confines of a building, however, with it comes the higher risks of dying. In the event that the player encounters an aggression spike, the tight quarters might prove to be fatal as it can prevent the player from escaping successfully if surrounded and swarmed (or with the only exit clogged with zombies).

Secondly, the enter-able building can act as a temporary outpost. With a claw hammer, some wooden planks and nails, one can barricade the entrances of the building. After doing so, the player will then need to clear the floor of any lingering zombies. Once both of these criteria are fulfilled, you can then press "O" to enter the Outpost Mode. But be warned, for these temporary outposts don't usually last very long before the system will spawn a mass of zombies to try and break in.

Looting

Dead Frontier - Lootable Object
Be it within the Inner City or within buildings, all lootable objects are highlighted in yellow with a "?" on it. To search the object for loot, all you need to do is to stand close to it and then press and hold "E" for a few seconds. If there is anything loot-worthy, a pop-up window will appear asking you if you would take the item.

Possible items that can be looted range from food, medicines, ammunition, weapons, armours, clothing, miscellaneous items to even cash itself. However, to actually perform the looting sequence might prove to be a tough challenge (especially in highly aggressive areas) because the persistent mobs spawning and chasing after you might not give you the chance to do so.

Aggression Spike

Dead Frontier - Swarm of ZombiesDead Frontier - Siren
When an aggression spike occurs, you will start to notice that the usually empty or nearly empty streets suddenly becomes filled with zombies spawning all around you or rushing towards you from out of screen. A tell-tale sign which signals the start of this spike is the sudden change in the tempo of the background music. When this happens, it is best that you abandon whatever you are doing and run towards the nearest end of the map area. Or if your confident enough, just stay and enjoy the killing spree brought forth by the spike.

From what I know, there are various conditions which can bring forth this aggression spike.

  • Weapon
    The different kinds of weapons in Dead Frontier is actually "coded" with a default "noise" parameter. Depending on how "noisy" the weapon you use to kill the zombies around you, this can bring about an increase in the spawning of zombies as well as "informing" nearby zombies of your presence.

    Typically, the most "noisy" and aggro-attracting weapons are chainsaws, machine guns, shotguns and the like. Pistols and rifles are less noisy in comparison to them while melee weapons are the least noisy.
  • Time
    While this factor is less important than weapon used, it does still contribute to an aggression spike. As your character stays hanging around at a particular location or map area, you will slowly attract more and more zombies until at last a spike occurs.
  • Siren
    This is one zombie you should steer clear of unless your looking for trouble. Although it doesn't attack you, it is by far classified as the most threatening zombie in Dead Frontier for the sole reason of its shrieks.

    If you fail to dispatch this zombie before it notices your presence, it will start to run around shrieking. This zombie actually acts like a siren (just as its name suggests) and its shrieks will rapidly increase the aggression level around you. Soon, you will literally have all the zombies in the map area chasing after you.
  • Opening of Inventory or Map
    This factor is actually more of preventing abuse rather than being a feature. Usually, when we try and open the map or inventory while in the Inner City, a timer will count down and then the map or inventory opens. During the time when the map or inventory is open, the player becomes "untouchable". But because of this safety feature, some players tend to "abuse" it to escape from mobs. Thus, the programmers came up with "coding" the game in such a way that when you use the map or inventory, you will increase the aggression level around you.

All in all, Dead Frontier isn't too shabby, but prolonged playing of this game will tire out a player due to its repetitiveness. All you do is run around killing zombies, trying to loot food, medicines, ammunition and cash for survival.


Previous: Dead Frontier (Part Two)

Thursday, August 9, 2012

Dead Frontier (Part Two)


Inside Outposts
As I've mentioned earlier, navigation within the outposts is in the form of webpages and once you've get the hang of it, its pretty simple.

On the left hand side of the page, there are three major functions, Inventory & Equipment, Messages and My Profile.
Inventory & Equipment

Dead Frontier - Inventory and Equipment
This is the page you would go to when customizing, feeding or healing your character. To feed your character, just click and drag the food item to your character's facial area. Likewise, when healing your character's health yourself, you can just drag the medical item there too.

As you can see in the screenshot, there are six clothing slots and three weapon slots. And as far as I know, the Hat, Coat, Shirt, Trousers and Mask slots are for cosmetic items. These items changes your character's appearance, but offers no protection nor stat boosts.

Armour is the only piece of clothing that actually reduces the amount of damage you receive from weapons or zombies. In exchange, they need to be well-maintained or they will break and become useless. Once an armour is broken, they will no longer absorb damage until they are repaired.

Dead Frontier - Corpse Carapace Armour
There are five pieces of important information you will need to know about regarding armour, durability, damage absorption, strength requirement, engineer level and stat boost.
  • Durability is the amount of damage a piece of armour can take before breaking.
  • Damage absorption is the amount of damage the armour can absorb. It reduces the incoming damage by the shown percentage while the rest of the damage passes through to decrease the character's health.
  • Strength requirement is the amount of strength you will need in order to equip the armour.
  • Engineer level is the minimum required level of the engineer you will need to hire in order to repair the armour.
  • Stat boost shows the amount of stats your character will gain when you equip the armour. The stat bonus will apply for as long as you have the armour equipped regardless of whether it is broken.
Weapons are used to fight the zombies inhabiting Fairview and most survivors use these to rid the streets of any undead they might encounter. Occasionally, however, these said weapons could also be used upon fellow survivors.

Generally, anything that takes up one of your three weapon slots is considered a weapon, but they can be categorized into six different types, melee, pistols, rifles, shotguns, machine guns and explosives (grenade launchers). Most of these weapons, in Dead Frontier, have a certain minimum skill requirement (in the appropriate proficiency) before you can use them. Some high level weapons may also require some amount in Strength too.

Dead Frontier - 577 Rex Rifle
Similar to armour, there are five to eight pieces of important information you will need to know about regarding weapons.
  • Ammo type is the kind of ammunition you will need to have in your inventory in order to use the firearm. These ammunition can be looted from corpses in the Inner City or bought from other players in the marketplace.
  • Round capacity is the number of shots you can fire before needing to reload. Pistols, rifles and shotguns often have a smaller round capacity compared to machine guns.
  • Reload speed is the time taken to reload your firearm. This amount of time can be shortened by increasing your character's Reloading stat. Reloading speed is calculated by the following formula:

    Reload Speed (seconds) = 0.25 + (124 - Reloading) * (Reloading Speed per point)

    Weapon Reloading SpeedReloading Speed per point (seconds)
    Fast Reload Speed~0.02
    Slow Reload Speed~0.03
    Very Slow Reload Speed~0.04

  • Firing/Attack speed shows how fast you can perform an attack using the weapon. This speed is inherent for the weapon and cannot be modified in any way.
    Firing/Attack SpeedShots/Hits per Second
    Very Slow Firing/Attack Speed1
    Slow Firing/Attack Speed1.5
    Average Firing/Attack Speed2
    Fast Firing/Attack Speed3
    Very Fast Firing/Attack Speed8.57
    Super Fast Firing/Attack Speed12
    F***ing Fast! Firing/Attack Speed12.24

  • Accuracy of the weapon reflects the relative ease of hitting a target with the weapon. The more accurate the weapon is, the less amount of stats a player will need to invest in the Accuracy stat in order to achieve a hit.

    Accuracy modifies the greatest angle of error that you can have when you perform an attack. It works pretty similar to the cone principle of a shotgun's spread. The more accuracy that you have, the smaller the spread of your attacks.

    Weapon AccuracyReliable Aim onscreenPerfect Aim onscreen
    Very High Accuracy4060
    High Accuracy6080
    Average Accuracy80100
    Low Accuracy100124
    Very Low/Ultra Low Accuracy124Not Applicable

  • Critical chance shows the probability of performing a critical hit with the weapon. The higher the critical chance of the weapon, the less amount of stats a player will need to invest in the Critical Hit stat in order to achieve a critical hit.

    When a player performs a critical hit, it does 5 times the damage as well as interrupts and knocks back the target. However, as good as it sounds, players must note that even at max Critical Hit, some of your attacks will still not be a critical. This is because the maximum chance to perform a critical hit caps at 80% for weapons capable of reaching this level and different weapons have specific critical hit rate caps.

    Weapon Critical Hit ChanceCritical Hit Rate CapPoints in Critical Hit to Reach Cap
    Very High Critical Chance80%80
    High Critical Chance80%112
    Low Critical Chance20%124
    Very Low Critical Chance4%124
    Very Low Critical Chance (Miniguns)2%124

  • Skill requirement shows the amount of points to be invested in the given proficiency in order to equip and use the weapon.
  • Stat boost shows the amount of stats your character will gain when you equip the weapon. The stat bonus will apply for as long as you have the weapon placed in one of the three weapon slots.
As for inventory space, every character first starts out with 14 item slots, but as you progress in level, you will gain four additional slots at levels 10, 20, 35 and 50 (which means a total of 30 item slots once you've reached Level 50). Each item you loot takes up one of your precious item slots. As for ammunition, however, they can be stacked up to a certain amount depending on their type. When you've used up all your inventory slots, you will no longer be able to acquire any new items until you have freed up some space in your inventory.

Messages
This is the place where you would visit to read private messages that other players have sent you as well as send your own to others. Additionally, automated messages informing you of the sale of your items in the marketplace will also be sent here as well.

My Profile

Dead Frontier - My Profile
On this page, you can see the stats of your character as well as alter your account and profile settings. It works pretty much like what you would have on a normal forum account.
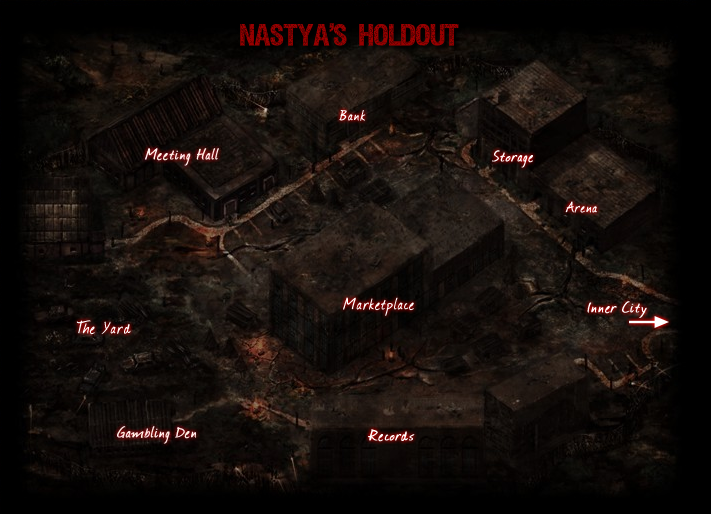

Dead Frontier - Nastya's Holdout
Arena
The Arena is a place where you can freely fight against fellow survivors without having to worry about maintenance costs. When you die or leave the arena, your health and armour are restored back to their previous conditions prior to when you've entered. You also do not lose any cash or experience when you die. The Arena purely exists to allow people to have fun PvPing with others and refine their PvP skills.

Bank

Dead Frontier - Bank
This is the place where you store the cash you've looted off corpses while scavenging in the Inner City. In addition, the cash you've gotten from selling stuff on the marketplace will automatically be placed in the bank as well. However, unlike the pre-outbreak banks, these will no longer give you interests for keeping your cash with them. Do note that your cash in the bank is linked and you can access it from any of the four outposts.

Gambling Den

Dead Frontier - Gambling Den
In the gambling den, you can wager your hard-earned cash for a chance of doubling it. All you have to do is find the Queen amongst the two jacks after the three cards are shuffled face down.

In my opinion, you should not bother with this feature at all, for it is almost impossible to visually keep track of the Queen's location as the cards overlap each other. Your chance of doubling your wager is at best one-third.

Marketplace

Dead Frontier - Marketplace BuyingDead Frontier - Marketplace Selling
The marketplace is where players can buy, sell or trade stuff that they have looted in the Inner City with other fellow survivors. It has three separate tabs for each of the above-mentioned activity.

To buy, you can either press the arrows to choose a category or type in the search bar to search for the particular item that you want. To sell, you can just click and drag the item from your inventory to the selling box area. A pop up window will appear for you to put a price in. Be sure to look at the price on the marketplace first before you sell the item or else you might end up selling lower or higher than the normal price.

To trade, you will need to go to a player's profile and click on the trade button that appears in there. You will then be directed to the private section tab in the marketplace. In there, you will see box areas labelled as Incoming and Outgoing Offers. All you have to do is to drag the item that you wish to trade to the Outgoing Offers and place a price on the pop up window that appears.

Another thing to note is that in order for you to trade, buy or sell with another player, you must be in the same outpost as that player. Likewise, items placed on the marketplace of a specific outpost will not appear in another outpost. However, because of this, the same item may have distinct prices between different outposts. For example, high level ammunition may be sold at a cheaper price at Precinct 13 or Fort Pastor (the place where they are looted) but at a much higher price at Nastya's Holdout and Dogg's Stockade.

Lastly, due to the limited inventory and storage space, players can also resort to using their marketplace slots as an alternate storage area. To do so, just sell the item at max price.

Meeting Hall
Although it is called the Meeting Hall, it is actually a forum. However, the purpose is still the same. Players often use this forum to meet up with others and organize looting runs and parties. At the same time, this place functions as a center where people ask questions as well as exchange information and tips on how to level.

Records
Just as the name suggests, this place archives the current standings for certain ongoing competitions between players for the title of being the "strongest" or the "richest". For your information, winners of the weekly competitions for "Top Survivor" or "Top Player Killer" will actually get a 24-hour pass to use the Elite Shop which sells certain unique items that cannot otherwise be obtained.

Storage

Dead Frontier - Storage
This is the place where players can store the extra stuff which they wish to keep while freeing up their inventory. However, due to the limited amount of free space available (well it is a post-apocalyptic game), each survivor is only given 5 storage slots initially. In order to obtain more room for your stuff, you must purchase more slots. They are bought in 5-slot bundles with the price starting at $25,000 and then increases in 25k increments. Do note that each player can only buy up to the maximum of 40 storage slots.

The Yard

Dead Frontier - The Yard
This is where you go to change the colour of your clothing, master craft or god craft your armour and weapons, rename your equipment or simply scrap any junk in exchange for quick cash (the prices you get are extremely low though).

As you know, weapons and armours in Dead Frontier can be enhanced in such a way that they give the player that has them equipped, a boost in Stats. Items with such enhancements are called Master Crafted (MC for short) or also "God Crafted" by the players if the enhancements are maxed out.

All Weapons can boost up to 3 Stats in the following order:

  • Accuracy
  • Reloading
  • Critical Hit
The boost value can go from 0 (in this case the boost will not be displayed as it is non-existent) to a maximum of 8.

All Armours can boost up to 2 Stats in the following order:

  • Agility
  • Endurance
The boost value can go from 0 (in this case the boost will not be displayed as it is non-existent) to a maximum of 24.

When you use the master craft option, you will need to pay upfront a fee of $15,000 (for weapons) or $30,000 (for armours). Stats will then be randomly applied onto the item. Alternatively, you can pay 250 credits (for weapons) or 500 credits (for armours) and choose to use the god craft option. Using this option will guarantee that you apply the maximum stats applicable onto the item (For Weapons: 8/8/8, For Armours: 24/24).

To Inner City
Click on this to enter into the Inner City.


Previous: Dead Frontier (Part One)Next: Dead Frontier (Part Three)

Wednesday, August 1, 2012

Dead Frontier (Part One)


The game I'm introducing today is Dead Frontier. It is of a pretty familiar genre to most people if not all. You basically run around killing zombies (that is if you still haven't guessed it from the name).

The story of Dead Frontier takes place in the city of Fairview. During the summer of 2016, a sudden biological outbreak resulted in the hordes of hungry dead zombies that are running around today. The human survivors eventually had to cluster together and form stongholds to ensure their survival, but reality is harsh and the weaker ones ultimately got overran. Currently, only four outposts are still standing - Nastya's Holdout, Fort Pastor, Precinct 13 and Dogg's Stockade.

Dead Frontier - Precinct 13Dead Frontier - Inner City
The game uses a mixture of web-based pages plus Unity. The Unity engine kicks in once you enter the Inner City but within the outposts, players navigate via the web-based pages.

While the gameplay is simple, just bashing zombies, the concepts behind it is not (I will explain them in a moment). The game makers have clearly spent some effort into making their game unique amongst other zombie-mashing web-based games.

Character Creation

Dead Frontier - Character Creation
The character creation in Dead Frontier is pretty simple. There's not much options for you to customize your avatar, but nonetheless, you still should not rush through it. Players should take extra care into choosing their profession because each profession has its own pros and cons and if you've chosen wrongly, it will cost you real cash (1000 credits ~ 34.95 USD) to convert to another profession. Alternatively, you can also spend in-game money to purchase these credits from other players.

Although there are currently 20 different professions available to choose, they can be generally narrowed down to four categories, Service, Production, Stat-Boost and Role-Playing.

Service
As the name suggests, people in these professions provide a service to other players. As they gain levels, the value of their service increases, but players will have to note that each service provided costs a certain amount of hunger. Starting from fully nourished, a Chef or Doctor can perform 10 services while an Engineer can perform 8 repairs before they become too hungry to continue providing a service.

  • Doctor:
    - Can administer complex medical treatments.
    - Starts with an extra $80.
    Doctors get a little extra starting cash, but they can also administer medications more effectively using their medical knowledge. The cost for using this ability is a loss of 8% Hunger each time the Doctor uses the ability on anyone including themselves. Doctors are only able to administer a healing item if they have the level to use it.
  • Chef:
    - Can prepare and cook high quality foods.
    - Starts with a Chef Knife.
    Quite a lot of food was left lying around when the outbreak came, but a lot of it cannot be eaten instantly and this is where the Chefs come in. They use their skills to prepare various kinds of food for the hungry survivors. The cost for using this ability is a loss of 8% Hunger for each time the Chef prepares and cooks for anyone or themselves.
  • Engineer:
    - Can repair armour.
    - Starts with an extra $50.
    Most people who knew a lot about technology or mechanical craftsmanship worked in large cities and were quickly killed when the outbreak first started, but a few lucky ones remain. Engineers get a small amount of starting cash, but they can also repair armour. Unlike other service classes, the cost for using this ability is a loss of 10% Hunger for each time a piece of equipment is repaired.

Production
Production personnel are able to create specific goods as long as the player has logged in at some point during the day. The number of items created is random while the quality of them is determined by the level of your character. A higher level character means higher quality goods being produced. The production cycle is once every 24 hours, but this production is not possible if your character is starving or in critical health.
  • Farmer:
    - Can create high quality foods.
    - Starts with a Mini-41 Rifle.
    Farmers have the skill to grow and find food more easily than others. They are able to generate two to four food items each day (24+ hours between production times, usually upon login). However, not all food the Farmers produce is instantly ready for consumption. As some of them needs to be cooked, Farmers and Chefs actually work hand-in-hand with each other. Farmers start with a Mini-41 and 80 5.5 mm rifle rounds.
  • Scientist:
    - Can create complex medical items.
    - Starts with an extra $50.
    Before the outbreak, Scientists were at the top of the income list. Now that their own work has destroyed humanity, they feel obligated to work on antidotes and medicines to aide the brave men and women who venture into the city to fight the infected. A Scientist will create two to four medications once per day (24+ hours between production times, usually upon login). These medications will have the most effect when applied by a Doctor.

Stat-Boost
Stat-Boost professions will always have a status advantage against other professions of a similar level. For example, Soldiers start out with +35 stats and +10 proficiency. Other professions without a status bonus will always be 7 to 35 levels "behind" a Soldier in terms of stats.
  • Boxer:
    - +20 Strength
    - +10 Melee Skill
    Professional Boxers, being quite strong and skilled, were always ready to defend themselves and easily survived the outbreak. Due to their strength and experience, heavy weapons and melee combat are of no problem for them. Boxers have no special abilities, but their pure strength and skill would scare even the zombies, if they still had minds.
  • Soldier:
    - +5 Strength
    - +10 Accuracy
    - +10 Endurance
    - +10 Reloading
    - +10 Machinegun Skill
    - -20% Experience Gain
    - Starts with a Skorpion SMG.
    A few Soldiers survived in the less infected areas, but most deserted the battlefields, having seen their comrades torn apart and re-animated, or their chain of command wiped out. Having had the most extensive pre-outbreak survival training, Soldiers are both physically and mentally fit. They also have advanced training in the use of machine guns. A downside of their extremely strict training is that Soldiers have a harder time learning new things, so they progress more slowly than other classes. Soldiers start with the Skorpion SMG and 300 rounds of .32 bullets.
  • Police Officer:
    - +10 Accuracy
    - +5 Reloading
    - +10 Pistol Skill
    - +10 Shotgun Skill
    - Starts with a Mancini Shotgun.
    Police Officers had to fight the infected alone at the start of the outbreak. Though they were later aided by many brave civilians, their losses were tremendous. Due to their training, Police Officers start with greater proficiency in the use of mid-level firearms, like pistols and shotguns. Police Officers start with a Mancini M1 and 25 rounds of 20 Gauge shotgun shells.
  • Fireman:
    - +20 Endurance
    - +10 Melee Skill
    - Starts with a Damaged Fire Axe.
    Firemen, being known for keeping their cool in emergency situations, were often the most reliable people to follow during the early stages of the outbreak. Now, they are known as smart and trained melee fighters. Wielding their trusty fire axes, they now seek survivors in a burning world gone to hell. The Fireman's Endurance bonus and axe make for a very strong start. Most Firemen quickly learn to appreciate the power and reach of the Damaged Fire Axe as well as the impressive Endurance bonus that helps to survive against attacks.
  • Athlete:
    - +25 Agility
    They're a bunch of people who just loved to train their bodies to the limit. Their rigorous training greatly helped when they had to flee the infected areas. Athletes are very fast and well-balanced people, who are great at loot 'n' run tactics. Their impressive agility helps them evade enemy hits or flee from any danger they may encounter. Besides their training, most Athletes have never really fought with weapons, but their agility is a dangerous weapon by itself, enabling them to circle their target and sprint out of the way of flailing limbs.

Role-Playing
Role-Playing professions get up to 30% more experience when killing zombies. Although this sounds great, you need to realize that they will always be behind stat-boost professions in terms of their stats. Although this might not be too visible at the start, however, once beyond level 50, the gap will become more pronounced. This is because after level 50, you will only get 1 stat point per level and 2 proficiency points. Nonetheless, if you plan on rising to the level 200 cap (a feat achieved only by a few) this might be the perfect profession for you!
  • Teacher:
    - +30% Experience Gain
    Before the crisis, Fairview's teachers ranged from private school ex-professors to barely-qualified inner-city personnel. When the city was hit by the wave of undead, those who were able to reach Nastya's Holdout make do with what little textbooks and school supplies they scavenge to try and make something of the Z-Generation.
  • Priest:
    - +30% Experience Gain
    Priests, the "Minds of the Public", were some of the last to stand up and fight, due to their relatively old age, as well as their strong faith and hope for an end. But when the first zombies entered holy ground, most Priests took up the sword of God and killed the unholy beasts without mercy. Now, it is their duty to cleanse the world of the sinful zombie filth. Few Priests survive for long, but those who do still fight with faith and hope in their hearts.
  • Lawyer:
    - +30% Experience Gain
    - Starts with an extra $100.
    Lawyers were once the most hated professionals on the planet, due to being stereotyped as defending evil corporations from righteous lawsuits, or propagating the endless cycle of frivolous lawsuits. This hatred dropped away when people exchanged subponeas for eating brains, naturally. Aside from legal scuffles that Admin or his squad tend to solve by reaching a compromise anyway, their skills haven't been called on for a while.
  • Accountant:
    - +30% Experience Gain
    - Starts with an extra $50.
    The job of an Accountant was always quite boring and underpaid during the 21st century, but since it was so common and easy to learn, many people had no choice but to accept it as a way of life. Now that many of their colleagues and managers have tried to eat them, they realized that the world has changed, their former career and knowledge is now worthless, and they must now learn a new path to survive through this horror. While others were busy searching for weapons and friends during the beginning of the outbreak, Accountants fled, taking only what they always had with them, cash.
  • Journalist:
    - +30% Experience Gain
    - Starts with an extra $50.
    Few Journalists were able to observe the outbreak, and even fewer came out unharmed from the crisis zones. Those who did, tried their best to warn the public with their gathered intelligence, pictures and videos. At first the government hid, suppressed and denied the facts, but soon the outbreak became uncontrollable and the public finally learned the truth. By then, most Journalists had fled the cities already. Journalists are not made for war, so their saved possessions include only a bit of cash.
  • Actor:
    - +30% Experience Gain
    - Starts with an extra $20.
    For obvious reasons, few Actors are known to have survived from the outbreak. The best-known actors, idols and celebrities quickly fell victim to zombie attacks, rioting or simply from a lack of survival skills in the now turned lawless city. Today, very few of them remain. Even of those who still live, almost no Actors would identify themselves as such. Those who do, seem to fancy themselves as storytellers and performers - the bards of the new world. Due to the fact that most surviving Actors were penniless romantics or have depended on credit cards and off-shore bank accounts, which are now worthless, they tend to only have a tiny amount of starting cash.
  • Stock Broker:
    - +30% Experience Gain
    - Starts with an extra $100.
    Being some of the most skeptical observers of the news and unconfirmed outbreaks, Stock Brokers were not prepared when the time came to leave the business districts. Although, once they realized what was going on, they used what little skills and lots of cash they amassed during their stressed lives to help themselves and others flee the cities. Stock Brokers are very glad that they were rich, even though they are just weak civilians. Always keeping a good load of "emergency cash" with them.
  • Architect:
    - +30% Experience Gain
    - Starts with an extra $50.
    Architects were a rare and creative breed before the outbreak, generally unprepared for a large-scale disaster. But as their beautiful buildings and grand houses crumbled, many found the inner strength needed to survive and fought just as hard as any other, using their knowledge to help build outposts and barricades.
  • Entertainer:
    - +30% Experience Gain
    - Starts with an extra $20.
    Entertainers led a strange life. Telling strangers jokes, making people laugh - it was all well and good, but the dead have very poor senses of humor. Escaping with what little cash they could scrounge up, Entertainers are a vital part of Outpost life, continuing their trade even after most audiences have turned into brain-eating monsters.
  • Student:
    - +22% Experience Gain
    - +1 Strength
    - +2 Agility
    - +2 Endurance
    These resourceful young men and women fight to retake the future that was stolen from them along with their homes, friends and families. Before everything went to hell, these bright yet inexperienced learners knew little but what their Math and English textbooks told them. After the outbreak, however, those who survived found themselves alone in a world ridden with death and chaos. With few options left, they abandoned their Math and English books and took up a new subject - Zombie Killing. Being a combination of the Role-playing and the Stat-Boost professions, the Student gets a 22% bonus in experience gain, which makes leveling slightly faster, but also gets a few small stat bonuses.


Next: Dead Frontier (Part Two)